Friday, May 25, 2018

Sari Scrap Flower Child Fairy

Every artist has their default zone, the supplies and techniques they turn to when they don't know what to work on or where to start. Sometimes artists have the need to putter with supplies as therapy and make art that feels comfortable and familiar and makes them happy. Sometimes we want to stretch, to try something new, different or even scary. But sometimes we just want to putter and be in the happy, familiar place. And both the new places and the familiar ones are good and necessary.

For some people the default zone is journaling, for others it is splattering paint, or drawing, or collage. For me, the happy, puttery place is making paper dolls.

My worktable, covered with paints, ink, scissors and bags of doll parts.
Sometimes my puttering is not even doll making, it just finding scraps of leftover projects and cutting arms, legs and torsos. Sometimes it is cutting interesting faces or clothing from a fashion magazine that may later become doll parts. I often use a doll body template that is available from Retro Cafe Arts, an online craft supplier. I also collect images of vintage paper dolls from sources such as The Graphics Fairy.

I keep a bin of doll components, and within that bin, baggies of faces, wings, shoes, hats, tops, bottoms, legs, arms and unfinished dolls. When I feel the need to regroup and relax, it is very meditative to pull out the parts and give birth to a new doll.

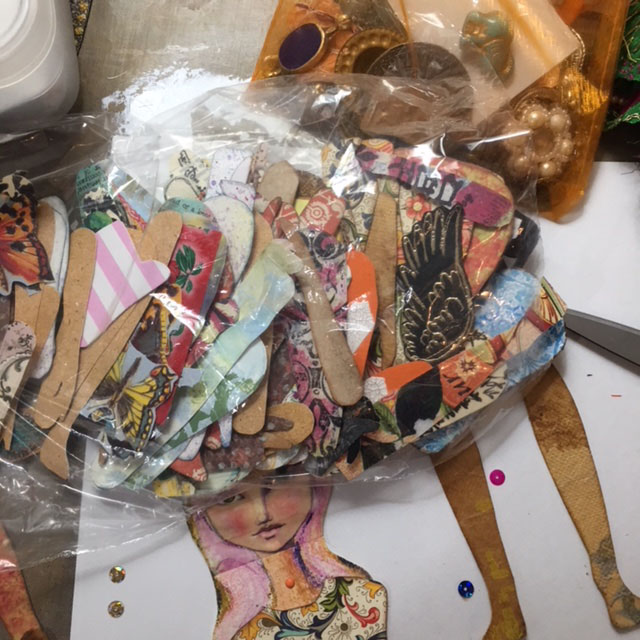
On top, a baggie full of some favorite paper doll components, and below, the start of a doll.
As I rifle through the baggies of parts, I select the ones that--in that moment--really strike me. Next, I move them around and audition the parts until the doll begins to speak to me. 
The head, from a fashion magazine, was too small, the skirt too short, and shoes too big.

This head was a vintage photo reprint with strips of Jane Davenport washi tape.
This face looked good, but was unfinished.

I liked the arrangement above the best, but the face was incomplete. Her eyes, nose and mouth are strips of Jane Davenport's washi tape that were placed on watercolor paper. I sketched in the rest of her head and hair with a pencil, added a neck and shoulders, then used Derwent watercolor pencils to complete the face.

I thought about leaving the green background, but decided a square head would look weird, so I cut away the greenish background, leaving only the hair and shoulders.


Strips of Jane Davenport washi tape formed the center of the face.

I cut a half-circular slit in the neck so the torso could be inserted, then secured it with a mini brad.
A piece of orange silk sari scrap fabric made a wonderful skirt. I gathered it at the waist, pulled the strings until it was the right size, and tied it in the back. A little dab of gel medium was added to keep it in place.

Once the skirt was stitched on, I discovered a couple of tiny holes in the orange silk, so I added a magenta sequin and clear gem, hand-stitching them carefully to cover the holes.
A hole in the silk skirt was challenging to fix.

A sequin and a bead covered up the holes and matched the mood of the fabric.

Arms, legs and wings were auditioned, chosen, and attached with mini brads and the doll was nearly complete. The torso and legs I selected are made from florentine paper, available on Gwen's website. I used some cardstock underneath the paper for added strength. The arms have a combination of commercial scrapbook paper and fabric covered with recycled teabags.

The finishing touch was special accent chain that was part of a shipment of Turkmen Jewelry Parts. It made a perfect belt, and was hand-stitched in place.

Detail shot of the fairy doll on my worktable.
The wings were made from a butterfly stamp on watercolor paper, and little peach floral brads attaching the wings to the arm add charm and whimsy. Layers of Baked Texture Embossing Powder were added on top of the stamped butterfly image. Dots of gold fabric paint were placed on the wing edge for contrast.

With her pink hair, wings, and fluttering sari skirt, she is a magical fairy, evoking spirit of a1960s flower child--perhaps my own inner child!

If you want to purchase any of Gwen's fabulous supplies, now's the time! There is a sale going on; just use this coupon when you check out.


Tuesday, May 15, 2018

Instinctive Scrap Collages

I am a scrap hoarder. Paper scraps, fabric scraps, beautiful enveloped that have arrived in the mail, gorgeous shopping bags, wrapping paper and festive ribbons are stuffed into my boxes and bins and closets. When an art project is finished, I often have beautiful scraps left over. I can't bear to throw them away, so I save them...sometimes for years. Sometimes I even buy beautiful paper, then decide it is too pretty to cut. And then I save it for years.

This weekend I had some extra time on my hands, so of course art was my top choice on how to spend my extra few hours. Instead of pulling out my paints and stamps and stencils and starting something completely new, I decided to work with the little bits and pieces I had been hoarding.

First, I made a collage in my large journal with some Tim Holtz printed tissue paper that I bought about two years ago and never used because it was just too pretty to cut.  I covered my page with it, and added an orange fabric circle flower--one of my own designs that was printed at Spoonflower, a stripe of a yellow fabric design featuring one of Gwen Lafleur's new stencils, and a pink and white stamped scrap of paper.  

I also created a quirky paper doll from scraps and decided that instead of putting it in my doll box when I was done, that I would attach it to the finished page. I had been saving a paper birdcage that was tucked into an envelope--an extra treat from a mail art exchange. Inside the cage, instead of a bird, I used a small ATC sized printout of a journal page that was created with a Jane Davenport stencil. The face of the doll was cut from a fashion magazine, and body parts are leftover paper from a mermaid project. The little legs sticking out of the bottom, as well as the butterfly, are vintage images from The Graphics Fairy.

I was on a roll using up scraps, so I turned to a smaller journal and started a collage using whatever pretty scraps I pulled out of my boxes...just whatever caught my eye at that moment in time. I used the pretty yellow and turquoise stenciled fabric design from the collage above, along with a yellow and white stenciled fabric design with a Jessica Sporn flourish design. I added a favorite Fabulous Florals yellow washi tape from Gwen Lafluer's website, some newsprint, and more of the Tim Holtz tissue paper. In the middle is a beautiful pink flower from The Graphics Fairy. Last, I added a couple strips of another of my own fabrics, a pink floral.
Next was a quick collage using newsprint that had been stamped with a Nathalie Kalbach art foamie, one of Gwen's new stencils printed in aqua on deli paper, and parts of a gorgeous envelope that I received in the mail from a Canadian member of the Paper Traders group. I filled in the gaps with more of the Tim Holtz tissue paper.
Below is another journal collage. This page has a center section of painted newsprint--a happy accident. I had covered my worktable with newsprint, and at the end of the day, liked and saved some of the abstract painted Sunday New York Times. Above and below are pieces of some beautiful les Oiseaux paper that Gwen Lafluer carries on her website. The center piece was an imperfect print of Gwen's Ornamental Petals mask; I arranged it to look like a snowflake, then added black ink at the edges to create a border. The top strip running through the snowflake print is a piece of another of Gwen's papers, a poppy.
Years ago I was experimenting with Photoshop layers and brushes and created this pastel leaf design. I stumbled on a printout of it and decided it would make a good journal background. Around the edges are assorted washi tapes. The tape with words is from Jane Davenport's collection. The pink striped paper is from some packaging, the little brown and white rectangles are printed teabags, the pink and yellow strip is a piece of my fabric (the same one that was used with the giant pink floral collage), and the turquoise half circle is part of an envelope that came in the mail from my sister. It made me happy when I saw the finished page, so I stamped the word "JOY" on the page. At the last minute, I found a washi tape word "dreamy" left over from the collage above, and stuck it on the bottom of the page.
It was fun to just instinctively create with what I found around me, and not worry about making great art, or using the latest art supplies. It was therapeutic to just go with my happy feelings--especially after a long, cold, dark winter that seemed like it would never end!


Friday, May 11, 2018

Medieval-Inspired Art Quilt

While working on an art piece recently, I stumbled on a half-finished project from a few years ago. The little quarter circles of orange and green and navy and magenta caught my eye as I was auditioning embellishments for the other project. It was an unfinished circle quilt, inspired by a 2011 article by Beryl Taylor in Quilting Arts Magazine about making a reverse applique quilt with a circle motif, then "slicing and dicing" it and arranging it into mismatched circles.

Due to a shoulder injury, I had stopped working with fabric in 2012 and switched to mixed media. Painting is gentler on my shoulder, and I sometimes paint, stencil or stamp with my non-dominant hand to save wear and tear on the bad shoulder. Watercolor and other soft materials are especially kind to my shoulder.

But, when I saw the layers of fabric and the rich colors, art quilting once again called to me.

On the left, the circle quilt pieces were auditioned on a yellow, green and aqua and 9-patch quilt.

A section of the slice and dice quilt with some unfinished artwork.

You can read about Beryl Taylor's technique in her book Mixed Media Art Quilts, and here is a link to my blogpost about trying the technique. I also made another "slice and dice" quilt with squares.

Below are the pieces of the reverse applique, slice and dice circle quilt. I knew it needed embellishment, so I started looking through my boxes and drawers for just the right elements.


As I was rummaging through my stash of fabrics, trims, papers and art supplies, I noticed that the colors of a piece of sari trim from Gwen Lafluer's website that was leftover from my "humble shoe box" project matched my leftover slices of circle quilt.

I had an "aha!" moment of artistic excitement.

The piece of Patchwork Sari Ribbon was just right in the middle of the reverse applique circles.
I realized that the center circles hiding underneath the sari patchwork ribbon were not necessary, and it would be a waste to cover them with the sari ribbon, so I removed them and added them (plus a few extra pieces) to the bottom and made the quilt longer.

There was a gap between the Sari Ribbon and the quilt squares.
However, the sari trim was a little short and a bit raggedy at the top and bottom edges, and the wine-colored fabric backing peeked through, so I looked through my assortment of sari scraps and found a bit of gold fabric that was just right to extend the trim. I carefully removed the gold edging from the blue silk cloth it was stitched to and added it above and below the sari trim.

Using some tiny, sharp scissors, I removed the gold trim from the sari scrap.

The gold trim was added at the top and bottom of the center area.

Once the Sari Ribbon was in place, the gold blended nicely at the top and bottom of the center strip.
I auditioned some embellishments to see what I liked as an accent. The background and center strip were working well togehter, but it seemed to need just a little more.

The paisley-shaped beaded snippet embellishment on the bottom of the photo below was gorgeous, but the shape didn't work with the Dresden Trim at the top.

Audition 1

Audition 2
After snapping a quick photo so I would remember the placement of the embellishments and center sari trim, I removed them and began zigzag stitching the quilted broken circle pieces.


When the quilt pieces were all stitched in place, I used a machine blanket stitch around the edges of the quilt to finish it. Serendipity was still with me...while I was looking through my trim box I discovered that the some of my Darn Good Yarn was exactly the right color to couch along the edges. I tested the five different yarns in my sample pack and settled on the red and orange variegated yarn.

The Spice Market Yarn Sampler - Warm Base, had five yarns to choose from.

I carefully pinned it in place and then hand stitched it with an overcast stitch and orange thread.

Detail of the quilt, with the hand-couched yarn edging.
I had settled on some gold paper Dresden Trim--four pieces at the top and two on the bottom, with a little golden disc that was part of an assortment of Turkmen Jewelry Parts. I didn't want to poke holes in the delicate Dresden Trim, so I used some gel medium to adhere it to the quilt. I hand stitched the Turkmen disc in place with some gold thread.


To me, the finished piece looks like a Medieval Throne. Although the quilted circles are decidedly modern, and the center of sari trim is from India, the Dresden Trim gives the quilt the impression of a Medieval Throne's carved back and legs. The deep, vivid colors along with the ornate gold of the Dresden Trim and Turkmen medallion add to the royal feeling.

 It felt really good to work on an art quilt again, although I must confess, my shoulder did get a little sore. I hadn't worked with fabric in quite a few years. My last art quilt, done in 2012, was a small piece that is hanging in the entryway of our apartment. It was mostly designed digitally, then printed on fabric, and is called Dare to Be an Artist. One of my other favorites--and last art quilts--is Dreaming of Fashion, which was also done in 2012 and appeared in Quilting Arts Magazine's August/September 2012 issue. Both of these old pieces are dear to my heart. This new Medieval-inspired piece reminds me of my roots, that I am at my core a fabric designer and art quilter, and that I should pull out my sewing machine more often and include stitching and fibers in my future mixed media work.