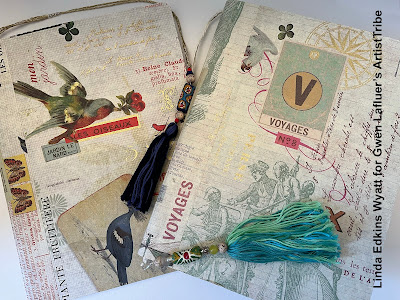
It's back to school time in my city, and that means school supplies are everywhere, especially the classic marbled notebook. Being a super frugal bargain hunter, I picked up a few from an off-season sale rack a couple months ago and tucked them on a shelf. When I got a recent shipment of goodies recently from
Gwen Lafleuer's website, I knew what I wanted to do with a couple of my favorite papers.
 |
| Here's a selection of some of Gwen's papers that came in my goodie box. |
 |
| The Florentine paper is a great weight to cover a marble notebook, but there are many others to choose from on the website. |
I carefully measured my notebooks and paper, then laid out the paper and cut it with my knife using a metal ruler on my well-worn green cutting mat. Next, I laid out my Teflon art mat, then placed some parchment paper inside the notebook to protect the inside papers.

Using some DecoArt Decou-Page, I covered the front with the glue, and super carefully laid the paper on. I smoothed it out with my fingers as I was adhering the paper to the notebook, then took my round baren tool and gave it a little more pressure and smoothing. I put the notebooks under a heavy weight for a few hours to dry, but since it was really humid, I used a blowdryer to finish the job, and used my baren to smooth the paper as I applied heat.
I debated whether to keep the existing black tape from the binding of the marbled notebook, but since the papers were both light in color, I decided it was too much contrast, and cut an extra strip to cover the binding.
They looked so pretty that I was tempted to stop then and there. But I kept hearing one of my old textile surface design teachers saying "More is more is more!"

So, the next step was to poke a hole in the spine with my awl, and thread some fiber through the hole to create a built-in page marker. I decided I wanted a tassel with beads on a long string as the marker. First, I started the tassel by winding embroidery floss around my fingers. Next, I threaded some jewelry wire through the top loop and twisted it shut. I cut and trimmed the bottom of the tassel.

To embellish, I added some gorgeous African Trade beads from Gwen's Boho Bazaar and smaller beads from my own stash to the wire, then and created a loop at the top. (I took an Ornaments and Amulets online workshop a few years ago where Gwen taught us how to make beautiful dangly pieces.)
I wired the cord to the beaded piece, making sure that the cord would lie flat inside the book and the beads and tassel would hang out the bottom.
I did have some gorgeous scraps left over after making the books, so, if you know my work and how my mind works, it should be no surprise that I cut paper doll parts using my new Paper Doll stencil available from StencilGirl. I added a whimsical ArtTeaLife face and put it all together with mini brads from Eyelet Outlet.
 |
| Using my Paper Doll stencil, I cut body shapes, arms, and legs from the leftover paper that had been glued to 140 lb. watercolor paper for extra strength. |
Since "more is more" she needed wings and a crown. Using a
VersaMark embossing stamp pad, I inked up the
stamps and stencils, printed them on black cardstock, and sprinkled the images with Ranger superfine gold embossing powder. When I heated the powder, the dull gold powder turned a magical shiny gold.
Here's some photos of the combinations of faces, body parts, and accessories that I considered.
Above are some gold on black possibilities that I considered.
The notebooks are a quick and easy gift to make, and certainly dress up the basic marbled composition notebooks! A doll made from the leftovers can be a gift on its own, incorporated as part of a greeting card, or perched on a wrapped package as an extra treat.
PLEASE NOTE: ***The paper inventory on Gwen's website gets updated regularly, so keep checking to see what new and gorgeous designs are available!***


yes you DO have a blog ! this is WONDERFUL ! going to check this out at lunchtime with a cup of tea and take more in. XO and thank U
ReplyDelete