Sunday, October 27, 2019

One Stencil Three Ways Challenge


When StencilGirl® columnist Tina Walker suggested a new challenge--using one stencil but creating three very different projects--I was intrigued. We were asked to select only one stencil and use it for a journal spread, a home decor item, and a project of our own choosing. We could not use any other stencils on the project.

The hard part was choosing which stencil from my stash. I needed something that was versatile and distinctive but could translate across three categories. I settled on a small design from the June 2019 exclusive StencilClub collection from June Pfaff Daley called Aboriginal, which was inspired by Aboriginal artwork from Australia. I chose the medium sized stencil, which has traditional marks and patterns.

For the home decor project, I stenciled (and collaged and embossed and painted) an inexpensive wooden picture frame that I picked up at Michael's for $1. First, I covered it with matte medium and layered on recycled turmeric teabags. They have a lovely golden color and give a warm, earthy feeling. Next, I used the Aboriginal 6" x 6" stencil with a fine white embossing powder.


The frame looked pretty good with the golden background and white embossing, but I decided to push the envelope a little and add more to it. I sponged some Distress Ink and Lumiere paints on top and it began to take on a feeling of the ocean. I decided to add a compass stamp to enhance the nautical feel. I stamped them onto deli paper, carefully cut them out, and adhered them with heavy matte medium.


I had intended to put a family photo in the frame, but it didn't look quite right. I found a favorite ATC, combined it with a pretty piece of scrapbook paper, and mounted it on a black background. It was just the right thing for my nautical/Aboriginal frame!

Next up: my journal page. Here's how it developed:


 I used strips of Jane Davenport's washi tape for the facial features, then painted in skin color to match.
 I added wild hair with Derwent watercolor pencils.
 I wanted to use a favorite quote by Maggie Kuhn, and tried a combination of stamped letters and handwritten words.
On the final version, I threw caution to the wind and hand-wrote the quote, making the words FEAR and TRUTH extra large and bold. To fill in the middle, I used watercolor pencils to create swirly lines.
The third project was Artist's Choice so I chose one of my go-to projects: a paper doll. I used a template from Retro Cafe Arts and mix and matched papers, vintage images from The Graphics Fairy, and a stamped face from PaperArtsy designed by Lynne Perrella.

First, I used the stencil on black paper with white embossing powder.


Next, I cut some paper doll parts from it using my template. I gathered up some doll parts that I had already cut and selected some pieces that would go well with the Aboriginal black and white design. I decided to lean toward a black and white doll, but in the end, did use a pop of color on the wings.


The final paper doll
Detail shot
Isn't it amazing how very different the projects turned out?


And don't forget to check out Tina's blogpost, and the work from the other artists involved in the project!


Wednesday, October 2, 2019

Beach Memories


For about 20 years, our family lived within walking distance of a beach. We went to it in all seasons--not just the bright, sunny, peaceful days of summer--but on the days that it was freezing, and there were big chunks of ice cluttering the beach...or the crisp fall days when it was too cold to swim and the leaves were golden and covered with frost. In any weather, the beach was a place to rest, gather our thoughts, meditate, and recharge.

Now we live in a small city apartment and that beach, on the eastern end of Long Island, lives in our memories. My daughter was recently redecorating her city bedroom. The gauzy curtains and green plants she chose reminded me somehow of that serene beach. I realized that her walls were bare, so I thought: "Why not gift her with a painting of our favorite beach?"

I didn't want to start with a plain white canvas. To add texture and color, I used my go-to supply--recycled turmeric teabags. (I save all kinds of teabags, dry them, empty out the contents, then flatten the teabags and use them in my paintings and mixed media projects. You can see my tutorial on using teabags by clicking here.)

First, I chose a 12"x12" stretched canvas. Next, using a spatula, I covered the canvas with matte medium, added teabags, and covered them with a layer of matte medium.


I like to use the tops that are cut off the teabags to create visual interest, forming X, L or + marks. 

Next, I pulled out acrylic colors that reminded me of the sun and sea and sand, and a whole bunch of StencilGirl® stencils. I looked for designs that would hint at waves, rocks, clouds or the sun.


The lacy lotus design by Jessica Sporn and Gwen Lafluer's decorative medallion gave the feel of clouds.The golden ochre of the turmeric background gave a sense of sunshine.
A design from the September 2018 StencilClub® set by Carol Wiebe was perfect for rocks--since the beach is on the bay side of Long Island's South Fork there are quite a few rocks mixed in with the sand.
 The painting was starting to shape up!
 I added layer after layer until I got the look I wanted.
I wanted to create a feeling of the little hill on the right side of the beach and the rocky paths leading to the shore. When I added the dark teal wavy marks, I realized it was too much. The color was too dark, and the shapes to obvious. So, I just stenciled over it with a lighter color and the dark teal receded into the background.

There are also wooden fences here and there to help prevent erosion, and also to keep people from trampling delicate beach grasses and flowers, so I used brown paint with a medium sized StencilClub® mash up set from January 2019 designed by Seth Apter and Mary Beth Shaw to give the worn fence effect.
 Another StencilClub® set, Mary Beth Shaw's February 2019 private collection, was used to add the feeling of rocks and water.

A final touch was adding little brush marks and dots with the dark brown paint to make the viewer's eye follow the Z shaped path from the sand and rocks, through the fence opening, and down to the waterline.

I hope she'll love her new painting. I'm pretty sure it'll look great on the wall of her newly decorated bedroom!


Be sure to hop over to each fantastic project and leave a comment for the artist! 
The more comments, the more chances you'll have to win $50 worth of StencilGirl® stencils! Good luck!
Claudia Neubacher's Tote Bag
Sunila & Aditi Mahajan's Treasure Box
Peg Robinson's Necklace
Shel C's Journal Set
Jennifer Gallagher's Paper Mache Gift Box
Linda Edkins Wyatt's Beach Memories Painting
Jill McDowell's Twisted Treasure Pouches
Carol Baxter's Advent Calendar

Contest closes 10-8-19 at 11:59 p.m. CST.  Winner notified by email 10-9-19.


Saturday, September 28, 2019

Faux-Leather Stenciled Jewelry


Jewelry made from StencilGirl® designs? And embossed onto painted a Lutradur surface that looks surprisingly like leather? Yes and Yes!

While rummaging in an old box of unfinished art quilts, I stumbled upon pieces of a half-finished project made with painted Lutradur and Tyvek. About five years ago, I had a vision of using strips of black and white harlequin painted Lutradur along the edges of my painted Tyvek design. The project never quite worked out, so I decided to try stenciling over the Lutradur to see what would happen. It had been years since I worked with Lutradur, a non-woven fabric that is often used in furniture construction and has been embraced by crafters.

Using a Versamark stamp pad through a stencil, the embossing powder looked perfect before heating.
The beauty of Lutradur is that it takes paint well, is lightweight, and can be easily stitched through by hand or machine. The downside is that it melts and becomes lace-like when you use a heat gun or blow dryer on it. My first attempt, on the partially painted harlequin design was a fail: the Lutradur melted away in the unpainted section and stayed put on the black painted areas.

Once I blasted the design with a heat gun, the unpainted (white) Lutradur melted. The areas painted with black gesso, however, were perfectly intact.
So, I decided to paint the whole strip of Lutradur, and covered it generously with black gesso. When dry, I tested various favorite StencilGirl® stencils using a variety of embossing powders. The fiber had more weight with the addition of the black gesso, and the paint prevented the Lutradur from melting when I heated the embossing powder. Gold, pale blue, and white looked great against the black. It looked surprisingly like black leather, but since Lutradur is vegan, lighter weight, and less expensive than leather, it was a win/win.

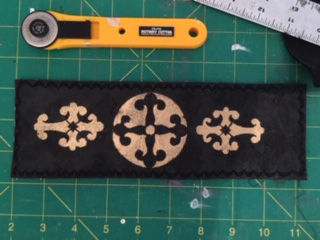
I set about stenciling some of my favorite StencilGirl® design on the black strips of painted Lutradur. I had a vision of making a cuff bracelet. I combined one of Jill McDowell's circular Japanese-inspired Crest stencils with a cross from Laurie Milka's Pilgrimage to the Renaissance.


 After the stenciling was done, using a rotary cutter, I cut the design to the length I wanted for a cuff.

The painted Lutradur was a little scratchy, so I also cut some black felt (to use as a lining) to the same size. After some deliberation, I selected a decorative stitch on my sewing machine and carefully stitched along all edges.

The finished, stitched cuff.
 I needed a closure of some kind, and decided to use Velcro. I carefully lined up three pieces of the Velcro on each end of the cuff.

The finished cuff is easy to put on and take off with the Velcro closure.

I was pretty excite about the success of the cuff bracelet, so I decided to make more jewelry. (It was kind of addictive!)

I used another one of Jill's Crest medallions for a pendant. I made two, and glued them together with Golden heavy gel gloss. I used Jill's full 2.5" circle as a template, traced around it with a pencil, and cut each shape so they would match perfectly. A small hole was punched with an awl, and a small jewelry ring inserted through the hole. I hung it from a piece of black cording that I found at my local bead store.


Clips held the two sides together while the glue dried. Be sure to cover the edges with waxed paper or parchment paper so the clip doesn't stick to the surface.
Some of my favorite India-inspired shapes from Gwen Lafluer's Not Afraid to Try design became earrings, as well as one of the shapes from Laurie Milka's Pilgrimage to the Renaissance.


Each earring shape was carefully cut out with small, sharp scissors.
I used a piece of wood behind the stenciled Lutradur to avoid poking holes in my worktable.
Two sets of the finished earrings.

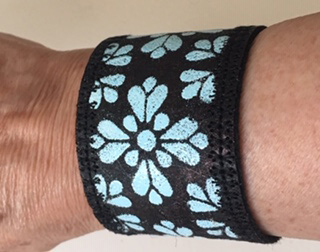
I decided to make a more delicate, feminine cuff with a floral shape using pale blue embossing powder. I chose a section of Laurie Milka's Pilgrimage to Mexico. I tried adding white dots to the edges but they smeared so I used only the blue area. After trimming away the excess, I cut a piece of black felt for a lining, and used a machine stitched floral design along the edges. Again, I used Velcro for the closure.


Last, I took some triangular shapes from Laurie Milka's Pilgrimage to India, cut them carefully, and attached them to wide black grosgrain ribbon with Golden heavy gel gloss and brass brads.


Each diamond was backed with black felt.


 Here are all the embossed design that I experimented with. A few of the embossed shapes are being saved for future projects.
 

Finally, here's the finished collection of my handmade, faux-leather jewelry, ready to be worn.

Tips:
* Lutradur is fibrous, so if it is humid, extra embossing powder can stick where you don't want it. The excess powder can be brushed away with a fine paintbrush before heating. 

* Any extra embossed powder that ends up in the wrong place can be covered over with a black sharpie. 

* It doesn't really matter if your embossing powder isn't perfect; the edges are going to be trimmed away so only the center of the design shows.

Stencils used:
Laurie Milka, Pilgrimage to Mexico Stencil
Laurie Milka,Pilgrimage to India
Laurie Milka,Pilgrimage to the Renaissance 
Gwen Lafluer, Afraid to Try
Jill McDowell, Crests