Thursday, September 9, 2021

Stenciled Affirmation Card Deck

Over the years, I have participated in quite a few of Tina Walker's stencil collaborations. They're always fun, creative, and push me to think outside my own box. The StencilGirl Affirmation/Tarot Card Collaboration was no exception...I'm really pleased with the deck I created: the cards have some of my favorite colors, designs, symbols, materials, and words.

Rather than beginning with a piece of plain white paper, I stumbled on a piece of 140 lb. watercolor paper that was smeared with bright colors. I thought I'd try using similar brights, and stenciling with my own designs on the paper. I chose some of my newest collection: my Lemurian Leaves, Blooming Violet, and the small Lemurian Leaf from my Wyatt ATC MixUp. I started with the Lemurian Leaf using white acrylic and a cosmetic sponge.

I added more and more of the white leaf, then used the other stencils in brighter colors. Here's how the design progressed:

Once I had colors and shapes placed all over the paper, I got out my cutting mat, metal-edged ruler, and exacto knife, and cut it into 2/5" x 3.5" ATCs. Some of them needed a little extra pizazz, so I added splotches of color and a few extra stenciled areas so each card would have a nice flow of color and shape.


Here's the ATCs:

I knew I still needed to design the back, and I also needed to find the right affirmations for each card.

I had a stenciled 140 lb. watercolor paper using a gorgeous Wendy Brightbill design a few weeks ago. It was just the perfect shade of pink to go with my cards, and the nature design complimented my ATCs perfectly.

The paper was really beautiful and I hesitated to cut it up, but I pushed on and cut it into 2.5" x 3.5" sections. Here's how the cards looked together:
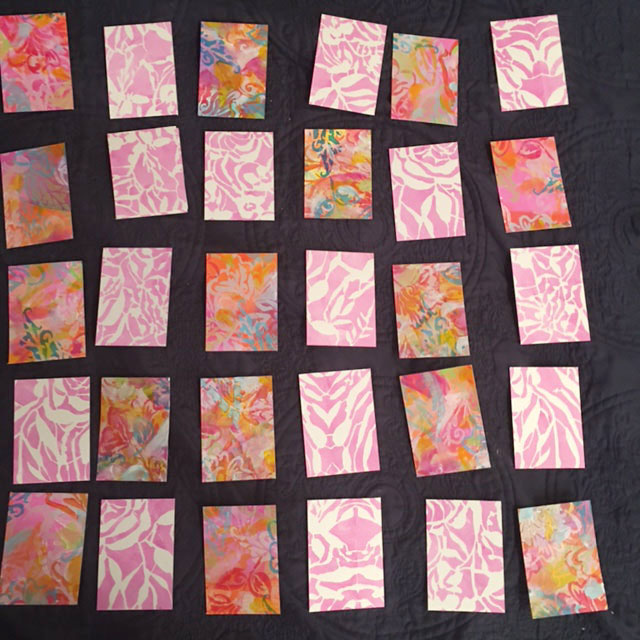
Two things were missing: words for the back of the card, and a little something extra for the front.

I decided to use the Sacred Heart ATC designs by Laurie Mika on the front, on top of my colorful Lemurian Garden designs. I carefully applied VersaMark embossing ink through the stencil designs, sprinkled on white embossing powder, shook off the excess, and zapped it with my heat gun. The effect was magical! The sacred hearts added an extra layer of meaning for me and the shiny white looked so pretty on top of the bright colors.

Using heavy matte medium gel, I glued the fronts and backs together and used a small fingertip sponge to apply sepia ink to the edges, which gave a finished look and hid any imperfections.

To create the words, I used my Photoshop program and typed the affirmations to fit an ATC-sized space, then printed them out of my inkjet printer on giant sheets (8.5" x 11") of Avery shipping labels. 


I cut the labels to fit, peeled away the backing, and pressed them in place. The clear label didn't even show once it was placed on top of the stenciled design...it looks like the words were printed directly on the cards.

Here's the finished cards, and a close-up of my two favorites.


Tuesday, September 7, 2021

Sing Your Own Song: Vintage Ephemera Journal Pages


Ephemera is such a magical sounding word. Incorporating ephemera (collectible memorabilia) and vintage images into your artwork really makes it unique and special. However, finding just the right ephemera can present a challenge.

The new EGL19 Build-a-Collage set, designed by Gwen Lafluer for PaperArtsy, has the feel of vintage ephemera. All the stamps are hand-drawn, and the set was inspired by Gwen's travels around the world and her love of the outdoors. There's a unique mix of natural items, combined with game pieces, invoices, and other whimsical images. 

I tested the stamps on quite a few different papers, both printed and plain, colored and neutral. Then, inspired by artist Nathalie Kalbach, I explored the idea of stamping on vintage ledger paper. Nat filled a vintage ledger with a series of colorful repeating patterns, stamped using her art foamies and rubber stamps. (Her series of videos is called “Pattern Monday—video from my ledger”.)

If you don't have a local source for vintage papers, such as yard sales or antique dealers, obtaining old images and items can be tricky. Since I didn't have a vintage journal on hand, I decided to make my own. I found several ledger images on The Graphics Fairy website and printed them in a variety of sizes. I also experimented with printing on some traditional ledger paper, which brought back happy memories of my mother, who was a bookkeeper.

Using sepia and black archival ink, I tested all of Gwen's Build-a-Collage stamps on the vintage-looking ledger paper…and I was in love! 


Next, I used both watercolor pencils and brush tipped markers to add color to the images.

Once I trimmed the white edges away, the papers were exactly the right size for my 5" x 8" Dylusions art journal! I used a gluestick and some matte gel medium to adhere the papers to the journal. Next, I added some dots here and there with my colorful Posca Pens. I also enhanced the eyes with some extra white and touched up any sketchy areas with a black or sepia fine-line marker.

I liked that the right side of the page was colorful, while the left was more stark. It needed a little more, so using Gwen's EGL-16 Deco Alphabet stamps, I added words: “Sing Your Own Song.” As I was working on the pages, the lyrics from an old 1969 Mama Cass song, “Make Your Own Kind of Music,” popped into my head. I thought the words of the refrain were appropriate, so I stamped them on. I often have song lyrics running around in my head when I am art journaling, and usually incorporate them into the page.

I used a clear stamp block that had gridlines, which helped me line up the letters neatly. I flipped the block over to see if I had them in the right order before printing.

When I was almost done, I noticed an empty spot on the left page. I decided to add a little bird going the opposite way. When I was testing the stamps on various papers, I had stamped the bird with sepia ink onto a dry, empty teabag. I carefully tore the extra paper away, then flipped the bird image over and carefully glued it in place. 

Somehow adding that little bird felt just right. Can't you just imagine it going its own way and singing its own special song?


*** Many thanks to Kimberlee Foster of The Back Office Diva for her technical assistance, and her eagle-eye for proofreading!

Wednesday, June 2, 2021

Vintage-Inspired House Book

If you love all things vintage, you're going to LOOOVE the newest stamp set from Gwen Lafluer for PaperArtsy: Tickets! The minute I saw the set, I thought of traveling back in time, and of fully blooming roses, lace, old sepia photos, and ephemera. So, I pulled out my stash of papers and started making a beautiful mess.

I tested the ticket stamps on plain, printed, painted, and dyed papers of various weights and textures with both black and sepia ink.

Next, I found some 140 lb. watercolor paper that I had sprayed with sepia distress oxide through my newest Lemurian Garden stencils. I cut the paper into house-shaped pieces, then gathered my roses and laces and vintage images from The Graphics Fairy.

I tried out different arrangements of the flowers, tickets, and photos, snapping photos as I found the arrangements I liked. I selected the five I liked best, then glued the pieces in place.


I had the idea of using a Dresden Gold window on the front of the book and putting a photo behind it. The gold seemed too bright, so I wanted to grunge it up. I finally ended up, after trying paints and inks,  using some of Seth Apter's Patina Oxide to age it.


It was time to "bind" my book. I envisioned it as a flip book, with three little rings on the side.


I started with some binder rings that could easily be opened and reclosed, but realized that they were too big and clunky, so I switched to smaller rings.


As I was putting the five house shapes together into a book, poking holes in three strategic locations, and adding rings to hold the book together, it occurred to me that the back pages were blank! Well, fortunately I have an abundance of flowers, lace, photos, and tickets, so I created the back pages.


 Here's the final book (above) and all the inside pages (below).


Monday, April 26, 2021

My Favorite Things: A Stamped Hamsa Tag With Handmade Beads

I don't know what took me so long to order Gwen Lafluer's "India" PaperArtsy stamp set...maybe its just that she has so many beautiful stamp sets to choose from! The set has features completely hand-drawn designs based on Gwen's travels and the motifs and textiles of India. I was especially drawn to the hamsa, an open right hand, an image used as a sign of protection and good fortune.

I used the large size manila shipping tag from Gwen's online shop, and cut a piece of coffee dyed watercolor paper to fit, then and added white acrylic through a stencil from my new collection.

The partially embossed hamsa stamp, before heating, on top of my "dobbie" design from the ATC mixup stencil.

Naturally the first stamp I used was the hamsa. If you're in New York, the Ink Pad NYC carries the India stamp set as well as lots of Gwen's stamps and stencils. 

I stamped the tag with VersaMark embossing ink, then sprinkled Seth Apter's Patina Oxide Baked Texture embossing powder, then zapped it with a heatgun. Magic!

Stamps were added one at a time to the stenciled base, building the design until the entire tag was covered.

I continued adding other stamps from the set. To fill in a couple empty spaces, when I was almost done, I added dots with an embossing pen, and a little diamond from the Tribal Faces stamp set.

For extra warmth and depth, I swiped the tag with an ink called "pumpkin pie," a delicious caramel color.

After auditioning lots of beads and trim to embellish the tag, I settled on some thick Dresden gold for the bottom, a cinnamon-colored sari silk for the top, my own handmade beads, and a faux coin from a Turkmen parts packet. I "grunged-up" both the Dresden gold trim and the faux coin by dabbing on sepia ink, aqua paint, and rust-colored paint until they looked worn and old.

This piece reminds me of the song from The Sound of Music, My Favorite Things. I used my favorite watercolor paper, favorite coffee dye, my own stencil design, my new favorite India-inspired stamps, my favorite Seth Apter embossing powder, my favorite Dresden gold trim, sari silk in an earth cinnamon color, and several of my handmade beads.

Here's a few closeups so you can see the delicious textures and colors.