Showing posts with label angels. Show all posts

Saturday, May 11, 2019

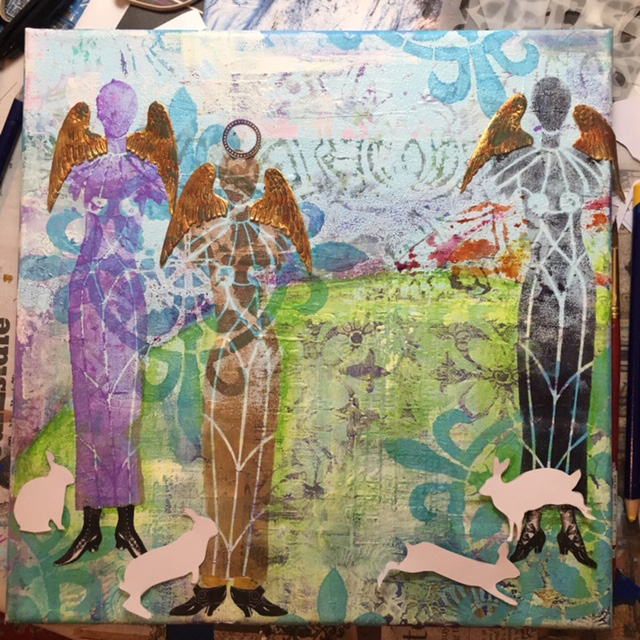
Dawn in the Garden

Years ago I began studying reiki and investigating alternative healing methods. One idea and image that stayed with me was the idea that energy is especially powerful at dawn and dusk. Meditating or doing reiki in a garden at either sunrise or sunset would not only have a calming and healing effect on the person, but would also help the plants grow better. The idea stayed in the back of my mind for a long time.
For my painting Dawn in the Garden, I started and stopped over a course of a few months. I did a background that was pretty, but I didn't quite know what to add to it to make it more interesting. I kept painting and adding more stencils (especially my favorite compass rose from Gwen's Ceramic Tiles club set) until eventually I was ready to add the foreground.
When I got a new shipment of StencilGirl® stencils, I knew that Carol Wiebe's Sacred Feminine angelic beings were just right for my foreground. I used black and sepia archival ink and a purple acrylic paint.
Of course the angels needed wings, so I added some Dresden wings and grunged them up with some ink.

When I lived in the country the little bunnies were always having a delicious dawn a dusk meal. They seemed to me perfect companions for the angelic beings.

First I cut them out of white paper and placed them around the canvas. I used a rabbit stencil from Tracie Lyn Huskamp. Then I sponged them on with white acrylic, but they were too sheer, so later I redid them using white crackle paint. I also added some vintage shoes from The Graphics Fairy.
I added a bunch of stencils in greens and yellows to suggest foliage, including one of my favorite stencils, Lacy Lotus by Jessica Sporn, and using circles from Carolyn Dube's Playtime StencilClub set, a sunrise/sunset with pinks, oranges and yellows.
 
I also added some grunged gold Dresden crowns with faux gems. I also used a black General's Scribe All pencil to add some shadows around the bunnies.

The figures weren't quite the colors I wanted, but fortunately, Gwen Lafluer's new Boho Blends worked perfectly to give the angelic figures some depth and shine. I used Wrought Iron on the far right figure, carefully masking over the shoes and bunnies with blue painter's tape.
 
 On the middle figure, the Cinnamon Boho Blend from the Spice Market trio was just right.
On the far left figure, the original purple was not working at all. I carefully placed the stencil back on the painting, added some VersaMark embossing ink, then sprinkled Lapis Lazuli embossing powder generously. I tapped off the excess powder, carefully poured it into the container, then zapped the figure with my heat gun.
What a huge difference! The figures were more harmonious, and had shine and depth.

The foreground still wasn't quite right, and I put the canvas away for a while. I wanted to add some flowers at the bottom of the canvas, but they just didn't come out right when I tried stenciling them with acrylic paint.

It dawned on me that some tiny flowers with the Paprika embossing powder would be just the perfect final touch! I used a flower stencil from Ann Butler's March club set for the flowers, then added a drop of gold Nuvo Drops for the centers.
Truthfully, I have never tested out the garden meditation theory...but I do aim to one day be a serene being gathering and giving energy in a garden of my own!

Friday, February 9, 2018

Love is in the Air

Valentine's Day brings out the little kid in me, with memories of small, inexpensive valentines exchanged between elementary classmates, eating teeny heart-shaped candy stamped with romantic words, and making elaborate heart shaped valentines trimmed with paper lace for my parents.

Seeing the new rag paper hearts on Gwen Lafluer's website brought out my inner artsy-crafty kid. They were in several shades of pink, and pretty all by themselves, but I knew I wanted to embellish them. After all, Valentines are meant to be over-the-top and schmaltzy, aren't they?

Lots of new supplies recently arrived. I used the new stencil, pink hearts and scrap cherubs
and flowers for this year's valentines.
I got to work mixing up shades of pink, and sponged various stencils onto the paper hearts. I found that some of the designs that I didn't expect to work, such as the deco series, looked wonderful on the paper hearts. I started out carefully, but as I got into the creative groove, I began mixing and matching stencils and colors and working on several hearts at the same time. And I got a little sloppy, but I covered any blobs and misprints with other stencils. I also knew that I would be adding cherubs, lace and words and some of the mistakes wouldn't show.
White acrylic was sponged through the Ornamental Petals Mask stencil onto a pink heart.
A Deco Border looked surprisingly good on the hearts, and covered up some blobs of paint that
leaked out when I printed the Ornamental Petals.


On a mauve heart, a pink Decorative Folk Flower looked just right.
The Ornamental Petals Screen looked good with shades of pink on a mauve heart.
The Ornamental Petals Screen was carefully lined up with the point of the heart before printing.
The Deco Border has a 1960s look when used with pink paint on a peach heart.
Here the Decorative Medallion stencil was applied in light pink on a mauve heart.
This valentine has a peach paper base, with the Deco Border and Decorative Medallion stencils. The white blobby misprint didn't matter once the center hearts and wings were added.
The stenciled paper hearts could have been left un-embellished, but what's a Valentine
without words, or cherubs or flowers or lace?
When I finished, they looked good. However, my inner child cried, "More, more, more!" So, the next step was adding some scrap cherubs and flowers. And some lace. And yarn. And decorative brads. And little hearts.

So I pulled out my boxes and bins and rifled through my stash of ribbon, trim, brads, buttons and lace looking for things that said "valentine." I "auditioned" different arrangements to find the right harmony of color and design.
My work table...creative chaos!
"Auditioning" various elements to see which to place where.
One thing I particularly wanted to use was some handspun yarn created by Artist Tribe member Lynda Shoup. I found a valentine in just the right shade of pink to harmonize with her yarn, and decided to stitch it along the edge.

The beautiful, hand-spun pink yarn matched the paint nicely.
An awl was used to punch holes, then the yarn was carefully threaded through.
After the yarn had been threaded through, I added white Nuvo Drops between each stitch.
I had carefully trimmed the excess paper away from my scrap cherub and floral bouquets. I also decided it was the perfect time to use some pink and white covered brads that I had been hoarding for about 10 years.
Fabric covered brads were placed along the edges of one valentine. The placement was planned on the back of the valentine, and an awl was used to poke the holes.
I had a rusted folk-art heart that went on one valentine, but I traced around it and cut several paper hearts from scraps of pink painted cardstock.
An elongated metal folk-art heart was the template for some pink paper hearts.
They still needed words, so I stamped "be mine" and "love" on some pink paper. I also used pink Nuvo Drops for dimensional interest and hand-wrote the word "love" on one piece with the pink Nuvo Drop dispenser tip. On another, I used a small floral punch to create peach daisies, and used pink mini brads as the center, then decorated the edges of a pinkish heart. They circled around the rusted heart, to which I added some whimsical mini wings.
This valentine had a border made of punched paper flowers with a mini brad center.
Here are the final valentines...now I just need to decide who to send them to!


In February, many of the Gwen Lafluer Artist Tribe are showcasing creations that honor Chinese New Year. You can check out their work here, and also save 15% on any of the items in the Exotic Orient section of the website with the coupon below.

Friday, December 8, 2017

Holiday Gift Tags


Tags are a quick and easy way to add a personal touch to a package. I recently made several sets of holiday tags to spiff up the gifts that will be soon under the tree in the Wyatt living room. The three groups of tags that emerged were all quite different--from girly and romantic, to masculine/traditional, to black and white graphic patterns.

The first set was the girly/romantic group. The German and English scrap angels really called to my inner-frilly side. One of the techniques that I return to time and again is using printed teabags in my artwork. When I saw the German and English scrap angels on Gwen's website, I immediately knew that--combined with printed teabags--they would be perfect for some holiday tag-making.

Scrap angels, blank tags, and printed teabags
I gathered some dry, empty teabags and, with some white acrylic, used some of Gwen's beautiful wood blocks to print the bags. (For a step by step tutorial on my "faux lace" process using teabags, click here)

A standard-size blank tag, and an oversized chipboard tag
Gluesticks work well for adhering the teabags to the base paper
Various laces and ribbons from my stash were
auditioned to see what went best with the printed teabags
An English Scrap Angel was "auditioned" for a standard-size tag

Before being glued, a carefully trimmed German Scrap Angel,
printed teabag and lace scrap were "auditioned" for a large tag

For a more masculine look, I chose some festive red and gold marbled paper from Gwen's sample pack, and combined it with a scrap of commercial scrapbook paper, a bit of polka-dot ribbon and one of the gorgeous Dresden Medium Medallions for a simple, yet striking tag.

A Comet Medallion was "auditioned" for the tag
to see how it looked with the marble paper and ribbon
Since layers of paper covered the tag's hole, an awl was used to poke a new hole in the tag
The medium medallion was attached with a large brass brad, and black words,
printed on clear mailing labels, were added
This close-up shows the mini brads that were added for a decorative touch under the inspirational holiday words
The next weekend, I was tired of red and green and obvious holiday themes and decided to see how some of Gwen's stencils would work in black and white for a holiday look. I painted some tags with white gesso, and others with black gesso. Some black and white gingham ribbon set the designs off nicely. On the tags below, I used both Gwen's cardinal stencil and Ornamental Petal stencil/mask with white paint on a black background.
White stencils and white gel pen on black painted tags
On the tags below that were painted white, I used a wedge cosmetic sponge and small dabber tool with a black stamp pad to print the holly section of the cardinal and holly stencil. Although it is not officially a holiday stencil, the Decorative Medallion stencil reminded me of a snowflake so I used that also. I added a few words here and there with either a black or white gel pen. Since I am not always perfect at stenciling, I fixed the places that were too sketchy or light with either a black gel pen, white gel pen,  and white or black paint on a tiny brush.

Holiday words were added to the stenciled tags using a black gel pen
I usually write the recipient's name on the back of the tag to keep the front looking festive. Now all I need to do is finish my holiday shopping so I have some gifts to wrap up and tie the tags onto!

During the month of December, you can save on German Dresden Trim and German and English Scrap using the code on the coupon below. There's still plenty of time to order so that you can create your own gift tags, cards, wrapping paper or other festive gift items!