Showing posts with label emerald creek. Show all posts

Sunday, July 7, 2019

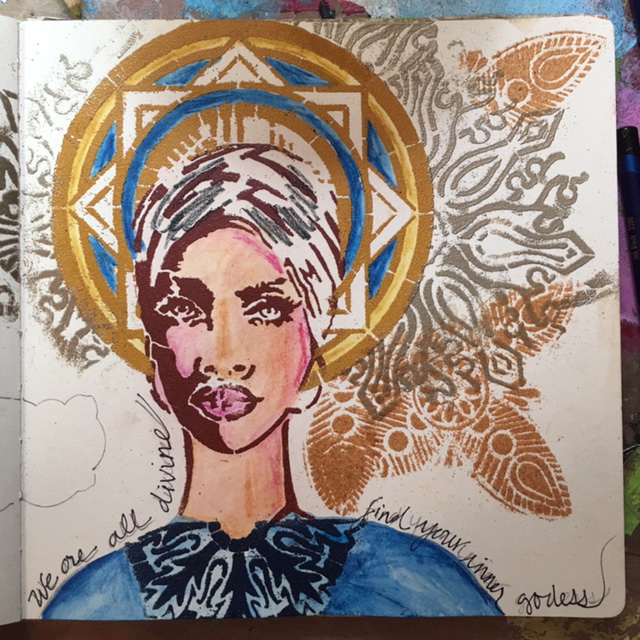
We Are All Divine

Many religious and spirituals traditions teach that we are all connected to the divine, to God, to the supreme being. Yet we treat ourselves sometimes worse than we would treat another human. We doubt ourselves, we have an inner critic who tells us we are no good, that we can't do what we dream of, that we are not worthy of success and happiness. Unearthing our own inner beauty was on my mind as I worked on this portrait.

The words "we are all divine, find your inner goddess" came to me about halfway through the piece, so I wrote them around the shoulders and neck of the figure with a fine sharpie.

I started with a StencilGirl® face design by Karen Johnson called The One. I chose the stencil because I wanted to create a universal, multi-cultural/multi-ethnic image.

I was excited try try my new Boho Blends embossing powder, developed by Gwen Lafleur for Emerald Creek. I applied sticky VersaMark ink through several stencils, sprinkled embossing powder, shook off the excess and blasted it with a heat gun. I also used quite a few of Gwen's stencil designs.

I knew she needed a halo, and I tried several different methods of creating it.  After some trial and error, I combined one of Gwen's stencils with a circular design by Nathalie Kalbach, and added some gorgeous blue Boho Bits for texture.

I made a short video that shows all the steps.

You can also check out some of the steps in the photos below.

 I decided the face and the background needed some color, so I used Derwent watercolor pencils to liven up the page. I also added the words "we are all divine, find your inner goddess" to the page.
 The pink and lavender accents looked pretty, but the halo was getting washed out, so I re-did the halo.
 The halo needed more depth, so I added Nat Kalbach's Grove Street stencil with the Lapis Lazuli Boho Blend.
 I wanted some interest on the right side of the page, so using black archival ink, I added a triangular border stencil from Pilgrimage to India by Laurie Milka.
 Last but surely not least, I used heavy gel medium and carefully applied the Boho Bits around the inner edge of the halo. I dabbed coordinating dots of Nuvo Drops on the outer halo and edge of the hairline.
With the addition of a little extra color on the hair, cheeks and lips, my divine goddess was almost finished. She needed wings. I had tried several wing ideas, and finally settled on a Baby Angel Wing by Kristie Taylor. Done in fine white embossing powder, it was the final accent that the page needed.
This artwork reminds me to embrace my own spirituality, that we are spiritual beings having a human experience, and helps me remember to treat myself and others with kindness.


Tuesday, July 2, 2019

Inner Goddess


When StencilGirl® gave the concept of "texture" for my July 2019 post, I decided to do what I like best--a portrait. I used some of my favorite products: white crackle paste, embossing powder, and acrylic paint along with some gorgeous stencils to give both a 3-dimensional texture and painted texture to the piece. 

Here's a short video (less than a minute!) that shows how the portrait developed:

To read all the details about my goddess, and see the step-by-step photos, here's the link to my post on StencilTalk®


Monday, October 8, 2018

Adorable Folding ATC Dolls

This summer, I joined Stencil Girl's monthly Stencil Club, and have been receiving a monthly shipment of three exclusive designs (small, medium and large) from some of their top designers. They have a Facebook page for club members where we can post our ideas and share photos and tips.

Each month they have a "party call" for members. The September Party Call was to create and exchange ATCs to celebrate the release of StencilGirl's new line designed just for 2.5" x 3.5" ATCs. We could use any StencilGirl designs for our ATCs. That theme was right up my alley, so, I got to work making my favorite kind of ATC--folding ATC paper dolls.

The bodies were made from some stenciled watercolor paper scraps that were leftover from a mermaid paper doll project I did earlier in the summer.

Scraps leftover from the mermaid tails were used for the folding ATC dolls.

I cut the scraps to 2.5" x 3.5"  and added some extra stenciling with a VersaMark stamp pad and Emerald Creek embossing powder.

Next, I used a paper doll template from Retro Cafe Arts and cut scraps of stenciled paper to create the arms and legs.

The outlines and features for the faces are also from a Stencil Club stencil. I added color and detail with water-soluble colored pencil, Derwent Blocks, and Tombow brush tipped markers.


Hair, necks and face color were added to the stenciled face outlines, which were then trimmed to become the doll faces.

Finally, I assembled the dolls by poking a hole through the ATC base and the limbs, then attaching them with a mini brad. The brads allow them to swivel and fold up to fit the required ATC size of 2.5" x 3.5". When the pieces are rotated into position, the ATC dolls are about 4" x 9".

Here's some worktable progress shots of the dolls:
Heads were stenciled and details added with watercolor pencils. The butterfly (for wings) was created by stamping VersaMark through a Gwen Lafluer butterfly stencil onto black paper, then sprinkling on gold embossing powder and heating to melt the powder.
A gold paper Dresden crown was aged with paint and Radiant Rust embossing powder for this doll.
Doll parts were placed in position before attaching with mini brads.

 Here's the final dolls, open and closed:


Interested in learning how to make your own ATC dolls? Later this year I will be teaching a Folding ATC Doll class at The Ink Pad NYC! I'm super excited to share this fun project. Look for announcements from me and The Ink Pad NYC about the date and time.


Friday, July 6, 2018

Turmeric Flip Journal


A lot of artists are hoarders--not the kind on television that need intervention--but we are savers of bits and pieces of pretty things. Sometimes we save ugly things because they are just so very interesting. We save pieces of pretty paper, yarn, fabric, metal, rocks, sticks and weird stuff from garage sales.

One of the many things I save is teabags--used, dried, and emptied of their contents. They add a nice vintage look to a page. (You can see some of my past creations here and here.) My husband recently switched to turmeric tea, and I loved the golden color of the bags, so he started saving them for me. (Is he a good husband or what?!)


Like many, I have boxes and drawers full of unfinished artworks. It turned out that a lot of them were 6"x6"...probably because that is the size of my geli plate. I decided to use the scraps up and put them in a journal.
These are some of the leftover hoarded and unfinished artwork that became book pages.
The center pages were part of a card I received from artist Jeanne Draachreider.
Recently an artist posted a journal she made that had a simple ring closure. So simple. So efficient. I loved it. I ran out to my local office supply store and snagged a package.

One of the problems with most bound journals is that once you start adding layers to a page, it gets fatter and fatter and eventually won't close. Often some of the back pages go unused because the journal just can't hold any more. Some people remove every other page, but that seems tedious and wasteful. A ring-bound flip journal seemed like a perfect solution to the "fat journal" problem.

 
First, I tried out the ring on my Index Card of the Day collection. I loved it. The cards flipped easily, and I could add and subtract pages without a problem. The cover was made of leftovers from a mermaid doll project.

I used some of Gwen's stencils in shades of blue and green as the base for the fins, and also used some of the embellishments from silk sari scraps plus a seahorse and starfish from the downloadable Stupendous Sea Life collection and a few Turkmen jewelry parts.

The dolls I made for my art doll trade group came out great too. Below are a few of them.
I wanted the turmeric journal to be a little more elegant than the Index Card of the Day flip book, so I decided to make the cover one continuous piece, with an inch or two for a spine, and have two rings. I got to work, cutting watercolor paper, smearing (with the side of an old credit card) matte medium on the paper, and layering the teabags. I was in my zone, working madly and happily like an elf at Christmas.


I especially liked the imperfections of the tea stains and the unevenness of the shapes where the teabags overlapped. I also liked the little snippets that were cut off so that the tea could be removed from the bag.

I criss-crossed the small strips on the book spine to enhance the rustic effect.
The wet spine of the book, with tea bag end strips forming loose crosses.
I left some of the pages with only the teabags. For others, I covered them with the geliplate prints and other small, unfinished artwork.

On some, I had to experiment with a new mandala stencil of Gwen's from the Boho Collection, and tried it several ways.


When everything was dry, I punched holes in the pages. For the holes on the front and back cover, I added some grommets for strength.

I tried out a some of Gwen's Fabulous Floral Embellished Trim on the cover as well as some of the German Dresden Trim, but they were too fancy with the utilitarian ring closure.
The sea-green and gold trim was pretty with the cover, but didn't work with the ring closure.
The Dresden Trim accent was gorgeous with the turmeric teabags, but the rings looked clunky next to it.
I loved the new mandala stencil so much I used it on the book cover with some of Seth Apter's Emerald Creek Radiant Rust embossing powder.

When I put all the pages together and attached the rings, it looked great. The circular design complimented the ring closure and the little grommets, and the warm rust effect went nicely with the turmeric's golden color.
 
So far, so good--but there was a problem. The journal didn't flip very well. The spine of the cover prevented the pages from laying flat, and the curve of the ring also inhibited the page-turning.
This page has a StencilGirl design by Andrea Matus DeMeng done in Deep Sea Baked Texture Embossing Powder.
This page has a StencilGirl design called Lacy Lotus, by Jessica Sporn.
The left page has a Damask design by Michelle Ward  printed on deli paper.
I tried some substitutes for the rings. A fiber closure was a fail. I tried some jewelry pins with wire twisted through both ends...also a fail. I tried taking apart a D-ring but the metal was too difficult to bend and even if I had been able to get the pages on the straight part of the ring, I wouldn't be able to open and close it.
 
 
I decided to go with function over beauty, and cut all my pages, as well as the cover and spine, apart. Now the pages flipped perfectly and the book would open completely and lay flat.

To finish, I dangled some of my favorite Turkmen jewelry parts on the rings. They go nicely with the rustic look of the turmeric teabags, and add a sweet, soothing tinkling sound. This just may be my new favorite journal!
The new journal, open flat, showing the back (left) and front (right)
A side view of the Turmeric Flip Journal
The finished Turmeric Flip Journal, with Turkmen jewelry parts dangling from the ring closures.