Showing posts with label StencilGirlProducts. Show all posts

Sunday, January 24, 2021

Artist Trading Blocks ala Mary Jane Chadbourne


Stencilgirl columnist Tina Walker is full of great ideas. I have participated in quite a few of the group projects she has conceived of over the years, and truthfully, those challenges have sparked me to produce some of my best work. The latest challenge was the Beautiful Minds Inspiration Collaboration: we were to choose an artist we admire or are inspired by, and create something in their style.

My mind immediately went to Mary Jane Chadbourne, whose website is called Desert Dreams Studios. She is an amazing, creative, colorful artist and has inspired me for years. She does all kinds of two dimensional and three dimensional work, but the ones I loved most were the stacking Artist Trading Blocks.

Mary Jane Chadbourne's Artist Trading Blocks inspired me.

I didn't want to wait to order pre-made blocks...I was much too eager. So, I made my own out of 140 lb. watercolor paper. I love building things and doing art-related math, so it was fun to figure out what size blocks to make, how to design them so they folded up into cubes. I made the top cube 2", the middle 3" and the bottom 4". Mine did come out a little wonky, making me think that next time I would order some that were perfectly square and perfectly flat.

Here's how I made the first block. (I used some watercolor paper that I had stenciled and didn't love.) 

Above are six stages in the construction of my small box.

After I had completed the construction of all three cubes, the fun began. I auditioned a variety of stamped, stenciled and printed images for the top, middle and bottom blocks.

Here's some process shots:
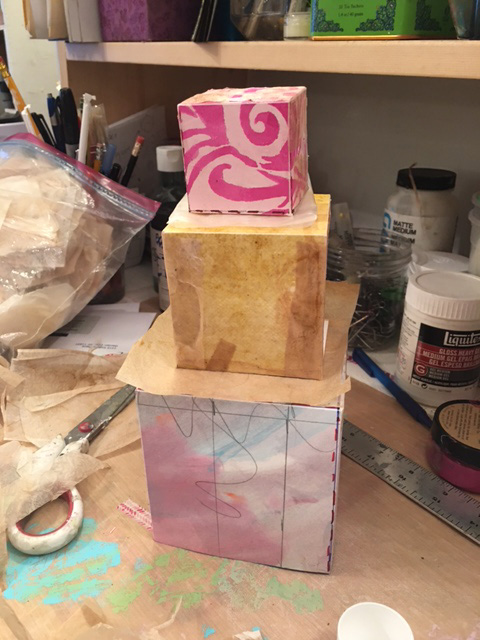
Here's the three cubes, piled between layers of parchment paper while the glue was drying.

I "auditioned" all kinds of faces, clothing, and accessories for each block. I used up scraps of painted, stamped and stenciled paper.


Little did I realize, when I started the project, that I would need to create 18 little works of art: each cube has six sides, and there were three cubes! My concept was that the bottom block would have a dress or skirt, the middle would have a face and shoulders, and the top would have a hat or crown on each section.

It is SO much fun to play with the blocks, to rotate them and mix up the different faces, outfits and hats. My Artist Trading Blocks definitely bring out my inner child, and I can't wait to make more!

STENCILS USED:

Nathalie Kalbach, Manhattan

Judy Wise, Judy Judy

Kristie Taylor, Tapestry

Laurie Milka, Pilgrimage to the Renaissance

Tina Walker, October 2020 StencilClub set, small stencil

Gwen Lafluer, Decorative Medallion

Valerie Sjodin, Leafy Doodle Merge


ADDITIONAL RESOURCES

ArtTeaLife/One Crabapple

The Graphics Fairy


Wednesday, September 30, 2020

UpCycled Picnic Tray

 This post ran on StencilTalk, the StencilGirl blog on September 30, 2020


Hi! Linda Edkins Wyatt here, sharing how I took an old, dilapidated serving tray and transformed it into an adorable, vintage-looking picnic tray! I used paper that I designed using all five of my Lemurian Garden stencils, which was then cut, carefully arranged, glued, and sealed on the tray to give the effect of a heirloom quilt.

The serving tray that I started out with looked pretty sad: it had holes on the surface and in the corners from wear and tear, but the frame and legs were still solid. I had tucked it in a corner and thought, "It's still functional...someday I'll fix this." When the StencilGirl theme of Home Decor came up, I knew it was time to breathe new life into the old tray.

The damaged serving tray—before its transformation.

I thought about painting it and stenciling on top but decided that I'd try a pieced paper patchwork effect instead of painting directly on the tray. I have spent much of my life around quilts and fabric, but this time instead of using cloth and stitching a design, I decided to use paper for the quilted effect.

I had a beautiful sheet of paper that I made as a sample for the July 15 debut of my stencils. I scanned the painting, then made printouts from my color ink jet printer. (Click HERE to see my full post about the stencil debut.)

I started with a big sheet of white watercolor paper and added my Lemurian Stencils in pastel colors.
 

Here's the final painting that I scanned and reprinted on paper:

In this allover design, you can pick out the leaf, tulip, lily, spiral and pansy stencils.

First, before I could beautify the tray, I needed to fix the holes in it. I filled in the holds with DAP Plastic Wood. After the fill dried, I sanded it smooth.


Next, I "auditioned" various prints and solids to go with the paper I made from my Lemurian Stencil Collection. I decided on some pink vintage prints and a polka dot from The Graphics Fairy.

I alternated squares of my printed Lemurian Garden paper with vintage pink and white patterns that I downloaded from The Graphics Fairy.

I cut the papers into squares, thinking I would do a simple checkerboard effect. My inner quilter said that the checkerboard was boring, so I got brave and cut each square into triangles, then arranged those pieces in a pinwheel design, reminiscent in color and design of a favorite childhood quilt.

The paper squares were cut into triangles for a pinwheel quilt design.

Once I decided on the pattern and colors, I began gluing them onto the tray with Liquitex Matte Medium.


When I measured the squares of printed paper, they fit perfectly on the tray. Somehow when I sliced the squares into triangles and created the pinwheel design, the shapes ended up smaller, and I was left with a white strip down the middle! I debated how to fix the problem.

Washi Roll to the rescue! 

Similar to sushi rolls, I had just made some paper "washi rolls" as a Stencil Club trade. Artist and StencilClub member Wendy Baysa has a really good youtube video on how to make Washi Rolls. I had made three rolls--I traded one 3" x 28" roll and saved two for myself. As luck would have it, or maybe because I'm a creature of habit, the colors went beautifully with the pinwheel pieces and they were just the right width. The hard part was deciding which roll to use on my tray. I loved the one with the green bunny, but the one with the black and sepia Julie Balzer stamps had more punch.

The Washi Rolls above were made with several layers of StencilGirl designs with both acrylic paint and archival ink, plus collage and stamps. I used paper from a vintage piano roll, reinforced it with with deli paper, cut it into 3" x 28" strips, then stamped, stenciled and collaged them.

I bravely cut the roll and glued it in place. I loved it! But....how would I waterproof the tray? After all, what good is a serving tray if you can't clean it? I didn't intend to eat directly off the tray, but I did want to be able to rinse it off or wipe it with a sponge or antibacterial wipe without damaging the tray.

The "washi roll" was just the right width to cover the white gap in the middle of the tray.

I tested some pieces of the stenciled paper with some of Seth Apter's Vintage Beeswax embossing powder. I put on a thin layer of matte medium, sprinkled the Vintage Beeswax liberally, zapped it with the heat gun, and magic happened.

The colors darkened a little, and the test paper now had a beautiful shine. I gathered my courage, held my breath, then embossed the whole tray section by section.


Here's a close-up of the tray. You can see the Lemurian Pansy in turquoise on the bottom left, and the Lemurian Tulip in pink on the bottom right:


With the addition of the matte medium and embossing powder, the whites had taken on an ecru color, the brightness was toned down and had an aged feel. The tray took on a vintage 1930s vibe and it reminded me of  an old fashioned picnic tray. 

With that idea in mind, I decided to make a matching picnic plate. This time, since I was working with a circular shape, I chose a circular quilt pattern. I downloaded a template from the internet, and cut little petal shapes out of my leftover paper, arranged them carefully, then glued them down to a paper plate I had covered with pink polka dot paper. Again, when the pattern was finished, I covered the plate with matte medium and Vintage Beeswax and heated it until the powder melted.


Since I made the plate from paper and glue, it is a prototype, and I will not use it for dining. But it would make beautiful design for a dinnerwear set, wouldn't it?

Inspired by the picnic mood and the Lemurian Garden theme, I took the tray to my nearest outdoor spot: Tudor City Park, a beautiful out of the way area of Midtown East that overlooks the United Nations. The quiet, peaceful park on a beautiful summer day was a perfect setting for my upcycled picnic tray and plate!