Showing posts with label Nat Kalbach. Show all posts

Saturday, August 12, 2017

Making a New Accordion Journal


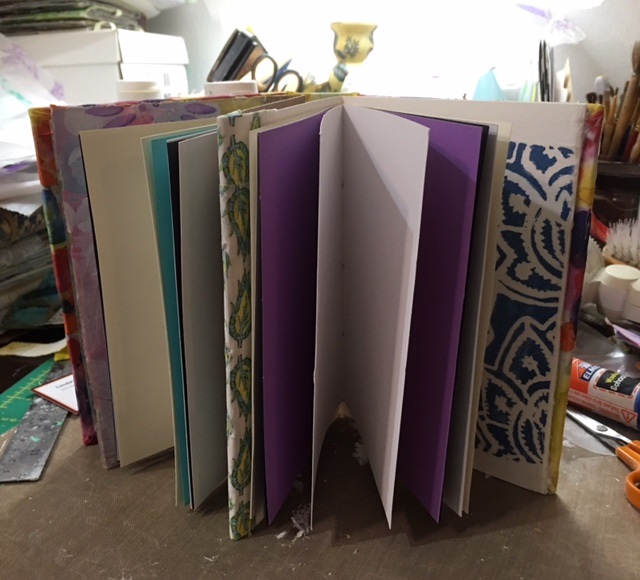
New handmade Accordion Journal, covered in fabric I designed and printed at Spoonflower
Finding just the right journal isn't easy, even with the multitude of styles available in art stores and business supply stores. For me, there are many factors: size, shape, weight and paper quality. For journals that I keep at home, weight doesn't really matter. But I have been looking for a little journal to tuck in my tote bag, one that I can use on my lunch hour or pull out when I have a chunk of unexpected free time.

Recently I found a journal making kit in an art supply store that looked just right. Small, lightweight, and since I enjoy the bookmaking process--fun to make. But when I opened the package, I was seriously disappointed. The paper was super flimsy, and no good at all for paint. The book spine was flimsy. There was no fabric or paper included to cover the book, and not much thread for binding. I debated about returning it, but didn't want to lose a couple hours going back to the store, waiting in line, and coming home.

So, I took the two heavy cardboard cover pieces and decided to make a new journal with them, using cardstock that I had on hand, and my own fabric as a cover. I cut a new spine from some heavy cardboard I had on hand, and cut a long, long rectangle to accordion fold and stitch my page signatures into. I used a method that I learned a few years ago in a class I took with Kelly Kilmer at Ink Pad NYC. Here's a link to another book I made with the method.

Step one was cutting the fabric and making sure I had enough to cover the edges and glue to the reverse side.


Next, I went to work on folding the long paper that would hold the signatures, I cut the paper to the size I wanted, put them together into signatures, and stitched them into the long folded paper.


The inside cover needed a book plate, so I chose some deli paper that I had painted and printed with one of Nat Kalbach's positive/negative art foamies. I also rifled through my scrap boxes and chose some paper and fabric scraps to cover the first page of the accordion.


Here's what the finished book looked like open and closed:


Now that I have made my new journal, I discovered what looks like the perfect little journal that I can use on my lunch hour. Artist Gwen Lafleur has a fabulous website with all kinds of unique trims, washi tape and embellishments. I have my eye on a little journal that is 8"x8" and has beautiful sheets of watercolor. Take a look at her website--the art eye-candy is plentiful and there are so many intriguing items it is had not to want it all!

Sunday, July 2, 2017

Turning Over a New Leaf

Doodles, doodles, doodles. I am constantly doodling flowers, leaves, geometric shapes, alphabet letters, names, and faces. I often collect my doodles and turn them into a design, or just tape them on a journal page for later reference.

After I doodled a leaf on a little blue sticky note the other day I realized the symbolism--I am actually in the process of turning over a new leaf--a new job, new duties, with a new location, new co-workers, a new commute--so what could be more appropriate than a journal page about turning over a new leaf?

Then, yesterday morning, I got a package in the mail with some art trades in it, and the trade hostess had included some little cutout pieces of...guess what?...leaves of course. So, I painted them green, and also used them as a stencil while I was painting them.

I was in love with my old journal. It was square, which is perfect for Instagram. Perfect for a Virgo who likes everything neat and square and tidy. But the new journal is a horizontal rectangle, which has me less in love with it than my old journal. Previous to the square journal, I used, or made, journals that were rectangular, but vertical.

So, I decided to create a square space on each page of my new journal, and either leave the extra space blank, or do something unrelated in that space. Sometimes I incorporate it into my design, sometimes not. On the page below, I put the blue sticky-note on the top right, and underneath, some of the little stencils of the cutout leaf shapes I received in the mail. The main design is on the left. I started with a page painted in a bright yellow--one of my favorite colors.

"Turning Over a New Leaf" journal page
 I used acrylic paints, paint pens, and Jane Davenport paint-over pens. Once it was dry, I added white printmaking paint with a Nathalie Kalbach Versailles art-foamie stamp around the edges.

When I was done, I realized it was strikingly similar to a design I made several years ago and turned into fabric. Here is the link to the fabric I designed a couple of years ago, and the blogpost about it. Not only do I keep doodling the same thing, I also seem to choose the same color combinations. I guess they are my happy shapes and colors.

Below is an art journal page that I did a few days before the "turning over a new leaf" page. Again, I used the happy yellow acrylic in the background, then added whimsical vintage paper doll parts, a model's face from a fashion magazine, and some of my own fabric scraps. I finished it with some handwritten words, a Retro Cafe Art solar flare stencil and Artistcellar inspirational word stencils.

"Riding the Waves" journal page
I realized recently something I have always known, but had forgotten: that I love not only making art, paintings, and designing fabrics, but I love turning them in to a useful, beautiful end product. Below I took some paper I had designed in Photoshop and output with a color laser printer on 8.5" x 11" paper, and, using an old envelope as a template, cut, folded and glued my own envelope. I added paper scraps and assorted washi tape. I used the fancy envelope to send out my folding ATC doll to the winner of the Paper Traders June "winner take all" ATC lottery. Here's the link to last week's post in case you were wondering what is inside the envelope.

"Mail Art" handmade envelope


Thursday, June 8, 2017

I Am the Phoenix

Life has thrown me a pretty big curve ball, but one result is that I am discovering how resilient I am. I am channeling my mixed emotions into my artwork, so my living room (aka art studio) has a lot of paint splatters, tools, brushes and paper scattered around.

"I Am the Phoenix"
 I Am the Phoenix is an art journal spread with collage, layers of gelli-plate printed deli paper, stencils, stamps, printed teabags and a Sharpie handwritten message. There is a lot of craziness in my life, but I used a Jane Davenport stencil--Tilted Up, from the series ArtistCellar used to carry--because I felt like I was a mermaid swimming up through the chaos to meet the surface. I used some of my favorite stencils for hair and the body and gave her wings to fly.

"Trust the Universe"
 Trust the Universe is another journal page. I used my favorite shade of turquoise (plus a spot of yellow and lime here and there) to cover the page, then sponged on black ink through some of my favorite stencils. The word Trust is an ArtistCellar pocket stencil, and I hand-wrote "the universe" with a sharpie.

"Frida" Journal Inside Cover
 When I saw the Crafters Workshop "Frida" stencil at the Ink Pad NYC during a class I took with the fabulous Nathalie Kalbach, I knew I had to snap it up before they sold out. (Frida and Georgia O'Keefe are my favorite painters.) I had a new journal that just seemed so big and new and empty, so what a better way to initiate the journal than with a Frida stencil? I used some Nat Kalbach art foamie stamps for Frida's body and also for the left edges. It was too neat and boring, so I added paint strokes and scribbles and words as well as some handwritten thoughts.

It was a thrill and honor this morning to see that the Crafters Workshop had reposted my Instagram from a couple days ago!
Crafters Workshop repost of Instagram post

Saturday, May 13, 2017

"Sew a Button On It" Self Portrait ATCs


When I saw the theme for a new Paper Traders ATC trade, I thought it was right up my alley. I love buttons, I love sewing, I love ATCs and I love painting. In addition to requiring a button on the atc, another requirement was to use a paper collage background. No problem...collage is my middle name. So, I got to work trying to make the vision in my mind translate into something real. I pictured something soft and romantic, like Sugar Lump Studios, with my favorite lace, maybe some tea bags and delicate stenciling. Something like I did on my blogpost about Faux Lace from Recycled Tea Bags.

First, I took some pretty paper, cut and ripped it into strips, and made a striped background. Next, I used my favorite new Nat Kalbach art foamie positive negative stamps over it with white printmaking paint. It was "meh." I tried lace. No good. Hideous in fact. I auditioned paper doll parts on top. No good.

The next day I was rifling through my paper scraps and found my old art business cards (as opposed to my 9-5-what I get paid to do business cards) with an old address that made them unusable. I have a little logo made of an altered self portrait with one of my fabric designs in the background. I decided to chop up the cards, and the small logo art looked just right on the striped and stamped background.

My worktable (also known as the living room table during the week) with the unfinished ATCs
I added some orange paper from an envelope someone had recently sent me, plopped on a few buttons, stitched them on with orange thread, and ran a brown chalk ink pad around the edges for a finished look. Done. Very far from the soft, romantic, lacy cards that I thought I was going to create, but still very "me"...literally, since the mini portrait IS me. Here is the link to my post called Fuscia Zetti Self Portrait, where you can see the oil painting that I used to make the design that ended up on my art business cards.

Three "sew a button on it" self portrait ATCs. I kept the middle one for myself.