Showing posts with label brads. Show all posts

Friday, April 6, 2018

Yearn - Dare


This art piece is an unexpected combination of a Gwen Lafluer Art Deco stencil with a self portrait, printed words, square mini-brads, and a real snakeskin. The elements shouldn't work together, but yet somehow they do.

I have always loved Art Deco. I fell in love with the period when I was a college student. When I got my hands on Gwen's Art Deco collection of stencils, I couldn't wait to try them out. I used my favorite go to color--pale aqua--which I painted onto smooth watercolor paper. Once it was dry, I carefully pulled some molding paste through two of the stencils.
Two Art Deco stencils by Gwen Lafluer with molding paste on a painted background.
As an experiment, I decided to add some color to one of them to see how which colors worked and what kind of paint covered the molding paste. At this point it was still just an experiment.
Color was added over the molding paste with assorted acrylic paints and inks.
The color looked pretty good, but the three circles seemed to need something different, so I tried some crackle paint on top.
Crackle paste was applied to the three circles.
I liked the effect, but didn't know where to go from here. So, I put it to the side and worked on some other projects. I kept looking at it and wondering what to do next. That wondering went on for almost three months.
The painted Art Deco background surrounded by sari scraps, Turkmen jewelry parts and other art supplies.
When I received a new shipment from Gwen's shop, I thought some Turkmen Jewelry Parts or Sari Scraps might work with the deco background that had been hanging around in my unfinished art pile, so I "auditioned" some elements. I auditioned old photos and various combinations of metal, coins, photos, and sari scraps. I also darkened some of the color and added spots of brown chalk ink to both the background and in the crevices of the crackle paste.

Audition of carefully trimmed sari scraps on the Deco background.
Audition of sari scraps and old photos with the Deco background. Can you guess who the baby is?
More sari scraps and vintage photo printouts.
A vintage headshot of my mother with sari scrap pearl flowers didn't quite work.
Assorted sari scraps had the right colors, but didn't work well with the background.
A stamped and painted image with Turkmen jewelry parts gave a Medieval feel, but still wasn't quite right.
A Victorian woman plus sari scraps looked interesting.
The Victorian woman with a sari scrap hat and gold Dresden trim also looked good.
Some were so-so, some were dreadful but none wowed me. The Victorian woman with sari scraps and Dresden trim was almost the winner, but the design seemed too safe, too sweet, to cute for that moment.

I started thinking about Gwen's 2018 stencil release and got really inspired by the words on one of the stencils: "What could I do if I wasn't afraid to try?" Although her new stencil was not available at the time I was creating this piece, the words stuck in my head.

With those words in my mind, I threw caution to the wind and grabbed an ATC-size printout of one of my own self-portraits and placed it in the center of the deco background. The printout had been created in Photoshop, using half of a scanned, original oil self portrait placed next to the same portrait with computer-designed enhancements. Weird, but interesting. Kind of fearless. I liked it. I liked the way it didn't go at all with the background. It wasn't at all deco. It wasn't pastel. It looked, on the background, the way I was feeling at that moment, so I trimmed it and glued it on.

The contrast of the self portrait with the Deco background was interesting,
but the beautiful Turkmen circles made it look like a lightswitch plate.
 I didn't love the Turkmen parts combined with the self portrait (although I do adore Turkmen parts!) so I decided to try some words on top of the crackled circles. I rummaged through my collection of printed words and found two that echoed the sentiments that I was feeling: yearn and dare. They were printed on clear Avery mailing labels, so trimmed them and carefully placed them on the top and bottom circles. I liked it, so I peeled away the backing and adhered them to the center of the circles.


The design seemed to need a little something more. I was feeling fearless and a little weird, so I rummaged through my stash of organic supplies (compliments of nature-love and ArtistTribe sister Jackie Neal) and found the skin of a garter snake. It called out to be part of the design, so I glued it on with gel medium. I didn't want it to crumble or fall off so I covered it with matte medium and added some random stamps of an old Julie Balzer stamp with embossing ink, then sprinkled on Seth Apter's Beeswax Baked Texture and heated it until the embossing powder melted.
The snakeskin and part of the background with granular Beeswax embossing powder, just before heating.
The heated Beeswax embossing powder worked, but the design needed just a little something extra.
The piece seemed almost done, so I left it alone. But it also seemed to need just a little something more, so I slept on it.

In the morning, I added three square metal mini-brads on the left top to balance the snakeskin on the right side. The color and shape of the brads enhanced the piece's balance, and the squareness and metal echoed the strength of the words yearn and dare.

While I was making this piece, Gwen's words had me thinking about what I dreamed of when I was younger, and how fear held me back. I remembered that as a teenager I dreamed of being a fashion designer, but I was afraid that I wasn't a good enough seamstress to be accepted in design school. I was also overwhelmed by the application process, and by the idea of creating a portfolio. So, I studied the field that my parents thought was a good choice, and got a degree in a subject that I didn't like. I was yearning for an art career. After getting my bachelor's degree, I decided to apply to a special one-year program at FIT. It took me an extra four years to believe in myself, but the yearning was there, and I finally did dare to go after the career I wanted. I studied fabric design, then became a fabric designer and print stylist, happily working on New York's famous 7th Avenue for many years.


Friday, February 9, 2018

Love is in the Air

Valentine's Day brings out the little kid in me, with memories of small, inexpensive valentines exchanged between elementary classmates, eating teeny heart-shaped candy stamped with romantic words, and making elaborate heart shaped valentines trimmed with paper lace for my parents.

Seeing the new rag paper hearts on Gwen Lafluer's website brought out my inner artsy-crafty kid. They were in several shades of pink, and pretty all by themselves, but I knew I wanted to embellish them. After all, Valentines are meant to be over-the-top and schmaltzy, aren't they?

Lots of new supplies recently arrived. I used the new stencil, pink hearts and scrap cherubs
and flowers for this year's valentines.
I got to work mixing up shades of pink, and sponged various stencils onto the paper hearts. I found that some of the designs that I didn't expect to work, such as the deco series, looked wonderful on the paper hearts. I started out carefully, but as I got into the creative groove, I began mixing and matching stencils and colors and working on several hearts at the same time. And I got a little sloppy, but I covered any blobs and misprints with other stencils. I also knew that I would be adding cherubs, lace and words and some of the mistakes wouldn't show.
White acrylic was sponged through the Ornamental Petals Mask stencil onto a pink heart.
A Deco Border looked surprisingly good on the hearts, and covered up some blobs of paint that
leaked out when I printed the Ornamental Petals.


On a mauve heart, a pink Decorative Folk Flower looked just right.
The Ornamental Petals Screen looked good with shades of pink on a mauve heart.
The Ornamental Petals Screen was carefully lined up with the point of the heart before printing.
The Deco Border has a 1960s look when used with pink paint on a peach heart.
Here the Decorative Medallion stencil was applied in light pink on a mauve heart.
This valentine has a peach paper base, with the Deco Border and Decorative Medallion stencils. The white blobby misprint didn't matter once the center hearts and wings were added.
The stenciled paper hearts could have been left un-embellished, but what's a Valentine
without words, or cherubs or flowers or lace?
When I finished, they looked good. However, my inner child cried, "More, more, more!" So, the next step was adding some scrap cherubs and flowers. And some lace. And yarn. And decorative brads. And little hearts.

So I pulled out my boxes and bins and rifled through my stash of ribbon, trim, brads, buttons and lace looking for things that said "valentine." I "auditioned" different arrangements to find the right harmony of color and design.
My work table...creative chaos!
"Auditioning" various elements to see which to place where.
One thing I particularly wanted to use was some handspun yarn created by Artist Tribe member Lynda Shoup. I found a valentine in just the right shade of pink to harmonize with her yarn, and decided to stitch it along the edge.

The beautiful, hand-spun pink yarn matched the paint nicely.
An awl was used to punch holes, then the yarn was carefully threaded through.
After the yarn had been threaded through, I added white Nuvo Drops between each stitch.
I had carefully trimmed the excess paper away from my scrap cherub and floral bouquets. I also decided it was the perfect time to use some pink and white covered brads that I had been hoarding for about 10 years.
Fabric covered brads were placed along the edges of one valentine. The placement was planned on the back of the valentine, and an awl was used to poke the holes.
I had a rusted folk-art heart that went on one valentine, but I traced around it and cut several paper hearts from scraps of pink painted cardstock.
An elongated metal folk-art heart was the template for some pink paper hearts.
They still needed words, so I stamped "be mine" and "love" on some pink paper. I also used pink Nuvo Drops for dimensional interest and hand-wrote the word "love" on one piece with the pink Nuvo Drop dispenser tip. On another, I used a small floral punch to create peach daisies, and used pink mini brads as the center, then decorated the edges of a pinkish heart. They circled around the rusted heart, to which I added some whimsical mini wings.
This valentine had a border made of punched paper flowers with a mini brad center.
Here are the final valentines...now I just need to decide who to send them to!


In February, many of the Gwen Lafluer Artist Tribe are showcasing creations that honor Chinese New Year. You can check out their work here, and also save 15% on any of the items in the Exotic Orient section of the website with the coupon below.

Friday, September 29, 2017

Earth Angel Warrior: A Modern Paper Doll


The things that made us happy in our childhood, when rediscovered as an adult, can be very healing and therapeutic. For me, one of the most joyful childhood pursuits was paper dolls. The fun was two-fold: they were imaginary friends that I could play with and create stories about, and they usually had a wonderful wardrobe—the kind I dreamed about owning or designing.

As an adult, I have rediscovered the simple joy of making paper dolls. Now my paper dolls are art dolls, with crazy hats, crowns, shoes, mismatched clothing, odd heads, and often wearing wings to help them soar. I search the Internet for paper doll templates and royalty-free vintage paper doll images, combining them with my own faces, fashions and magazine advertising images. I relax and become a child again when I putter with my boxes of doll arms, legs, bodies, clothing and heads.

For my latest doll, which I call the Earth Angel Warrior, I started with pre-cut doll pattern from Retro CafĂ© Arts. Some time ago I purchased (and used) their chipboard doll, but I saved the leftover cutout/negative space to possibly use as a template. I flipped over a piece of Gwen Lafleur’s gorgeous Florentine paper (which I had already glued to cardstock to give it extra strength for doll-making), then traced the arm, leg and body sections, then carefully cut out the parts.

Doll template, Florentine paper, and other supplies.
Body parts were traced on the back of the cardstock/Florentine paper.
Front of legs on left, back of legs on right.
The basic paper doll parts, made with Florentine paper.
Next, I searched through my boxes of scrap paper and doll parts and “auditioned” different elements. I also looked at Gwen’s downloadable “wondrous wings" PDF to see what caught my eye. I knew my doll would need wings, and I tried several of them, settling on some eagle wings. I sifted through my box of doll faces and found a model’s head from a magazine advertising photo which spoke to me. I also found a little piece of an orange mailing envelope and decided to use it for the torso.

I sorted through my collection of doll heads, hand painted faces and magazine photos.
The face and wings were gray-scale, and I felt they needed a bit of color, so I enhanced them with TomBow brush tipped markers and chalks. I added royalty-free vintage boots from The Graphics Fairy, and an upside-down butterfly from Gwen’s PDF for a hat, an idea inspired by artist Mary Jane Chadbourne.
The doll parts placed together, but not yet attached.
The grayscale wings and face, as well as the monochromatic butterfly,
got a color boost with TomBow markers and pastel chalk.
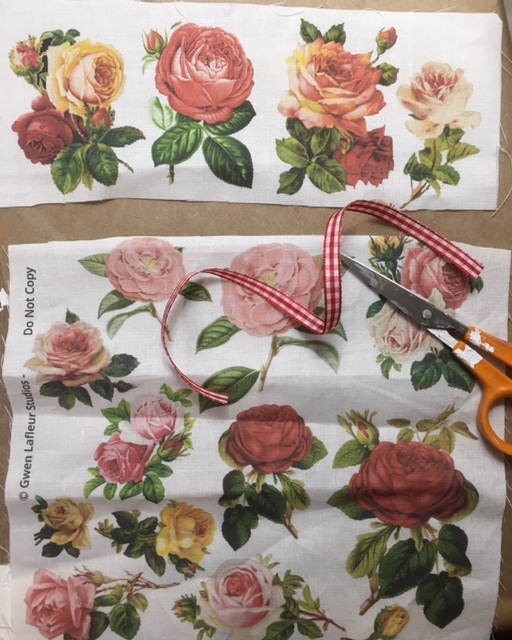
My inner fashion designer decided she needed a skirt. I printed one of the “fabulous florals” PDFs on cotton fabric, then cut a strip, stitched across the top, and pulled the strings to gather it to suggest a skirt.

To print on fabric from an inkjet printer, here’s what you do:
  • 1-Cut a section of cotton fabric about 9” x 12” and iron so it is wrinkle-free
  • 2- cut a piece of freezer paper about the same size
  • 3-place the shiny side of the freezer wrap against the wrong side of the fabric and iron until they fuse and are flat and wrinkle-free (do not use steam)
Freezer paper was ironed on to white cotton fabric in preparation for printing.
After the fabric and freezer paper were fused with an iron, it was cut to 8.5" x 11"
  • 4-using a cutting mat, metal ruler and sharp exacto knife or rotary fabric cutter, trim to exactly 8.5” x 11” so it is the size of a piece of paper.
  • 5-snip off a tiny bit at top left and right corners. This will help the fabric pull through the printer without jamming.

Snipping a tiny bit from the top corners helps the fabric feed through an inkjet printer without jamming.
  • 6-test your printer to see whether to place fabric face down or face up in the printer
  • 7-select the design you want, press print, and it should emerge from your printer
  • 8-peel the freezer paper away, and you will have the printed cloth. If desired, iron the fabric to help set the design and prevent running or fading.
Gently peel the paper from the printed fabric after it comes through the printer.
Two of Gwen's downloadable pdfs were printed on fabric.
For the doll’s skirt, I chose a section about 4” x 8.5”. Rather than keeping the skirt flat, I decided to gather the top to add some dimension. I also added, using a glue stick, a little checkered ribbon at the bottom. Glue sticks are great when using fabric with paper because they don’t stiffen the fabric or cause discoloration. I also added a little rust-colored piece of Gwen’s sari silk ribbon as a belt, which also covered up the stitches at the skirt’s top.

The top few inches of the rose-printed fabric was cut for use as a doll skirt.
Close-up of the skirt fabric, with stitching at top (to be gathered) and gingham ribbon at bottom.
The skirt was gathered at the top and fit to the doll's waist, then glued in place.
The finishing touch was a belt of Gwen's orange sari silk ribbon.
Mini brads were used to connect the body parts and enable the doll to be posed.
The final step was putting all the pieces together. Unlike traditional paper dolls that don’t have moveable parts, and have ineffective little tabs to hold the clothing on, I like to use mini brads to assemble my dolls. With an awl, I hold the pieces in place, then gentle poke through both layers to form a hold. Brads come in many shapes and sizes (like and can be subtle, or used as another design element.

The finished Earth Angel Warrior paper doll, with flora & fauna elements.

When all the elements were put together and I saw the finished doll, I realized that she was made of flora and fauna elements—with the bird wings, butterfly hat and rose skirt. While her face wasn’t traditionally pretty, it looked fierce, confident and interesting, and she seemed like a warrior. So, I decided to call her my Earth Angel Warrior. As a finishing touch, and to echo the flora/fauna theme, I put a feather in her hat and another in her hand.


 We are doing a Gwen Lafluer Artisttribe BlogHop!

One lucky winner will receive $20 Gift Card to the Shop at Gwen Lafleur Studios! All you need to do to enter is leave a comment on any or all of the blog posts during the hop - the more blogs you comment on, the more chances you have to win! (One comment per person per blog please.)
You have until Sunday, October 1st at 11:59 p.m. mountain time to leave your comments. The winner will be announced on the Gwen Lafleur Studios Facebook page (http://www.facebook.com/GwenLafleurStudios) on Monday, October 2nd.

Please visit the blogs of the other Artisttribe bloghop participants:

_____________________________________________________________________________ 
  • To visit artist Mary Jane Chadbourne's website, click here
  • For the Retro Cafe Art website, click here
  • For the Graphics Fairy website of vintage downloadable images, click here