Showing posts with label wings. Show all posts

Friday, May 25, 2018

Sari Scrap Flower Child Fairy

Every artist has their default zone, the supplies and techniques they turn to when they don't know what to work on or where to start. Sometimes artists have the need to putter with supplies as therapy and make art that feels comfortable and familiar and makes them happy. Sometimes we want to stretch, to try something new, different or even scary. But sometimes we just want to putter and be in the happy, familiar place. And both the new places and the familiar ones are good and necessary.

For some people the default zone is journaling, for others it is splattering paint, or drawing, or collage. For me, the happy, puttery place is making paper dolls.

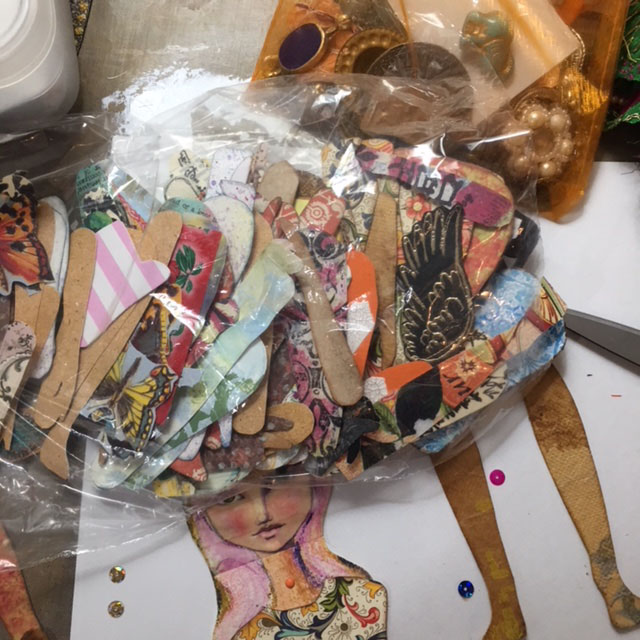
My worktable, covered with paints, ink, scissors and bags of doll parts.
Sometimes my puttering is not even doll making, it just finding scraps of leftover projects and cutting arms, legs and torsos. Sometimes it is cutting interesting faces or clothing from a fashion magazine that may later become doll parts. I often use a doll body template that is available from Retro Cafe Arts, an online craft supplier. I also collect images of vintage paper dolls from sources such as The Graphics Fairy.

I keep a bin of doll components, and within that bin, baggies of faces, wings, shoes, hats, tops, bottoms, legs, arms and unfinished dolls. When I feel the need to regroup and relax, it is very meditative to pull out the parts and give birth to a new doll.

On top, a baggie full of some favorite paper doll components, and below, the start of a doll.
As I rifle through the baggies of parts, I select the ones that--in that moment--really strike me. Next, I move them around and audition the parts until the doll begins to speak to me. 
The head, from a fashion magazine, was too small, the skirt too short, and shoes too big.

This head was a vintage photo reprint with strips of Jane Davenport washi tape.
This face looked good, but was unfinished.

I liked the arrangement above the best, but the face was incomplete. Her eyes, nose and mouth are strips of Jane Davenport's washi tape that were placed on watercolor paper. I sketched in the rest of her head and hair with a pencil, added a neck and shoulders, then used Derwent watercolor pencils to complete the face.

I thought about leaving the green background, but decided a square head would look weird, so I cut away the greenish background, leaving only the hair and shoulders.


Strips of Jane Davenport washi tape formed the center of the face.

I cut a half-circular slit in the neck so the torso could be inserted, then secured it with a mini brad.
A piece of orange silk sari scrap fabric made a wonderful skirt. I gathered it at the waist, pulled the strings until it was the right size, and tied it in the back. A little dab of gel medium was added to keep it in place.

Once the skirt was stitched on, I discovered a couple of tiny holes in the orange silk, so I added a magenta sequin and clear gem, hand-stitching them carefully to cover the holes.
A hole in the silk skirt was challenging to fix.

A sequin and a bead covered up the holes and matched the mood of the fabric.

Arms, legs and wings were auditioned, chosen, and attached with mini brads and the doll was nearly complete. The torso and legs I selected are made from florentine paper, available on Gwen's website. I used some cardstock underneath the paper for added strength. The arms have a combination of commercial scrapbook paper and fabric covered with recycled teabags.

The finishing touch was special accent chain that was part of a shipment of Turkmen Jewelry Parts. It made a perfect belt, and was hand-stitched in place.

Detail shot of the fairy doll on my worktable.
The wings were made from a butterfly stamp on watercolor paper, and little peach floral brads attaching the wings to the arm add charm and whimsy. Layers of Baked Texture Embossing Powder were added on top of the stamped butterfly image. Dots of gold fabric paint were placed on the wing edge for contrast.

With her pink hair, wings, and fluttering sari skirt, she is a magical fairy, evoking spirit of a1960s flower child--perhaps my own inner child!

If you want to purchase any of Gwen's fabulous supplies, now's the time! There is a sale going on; just use this coupon when you check out.


Friday, December 22, 2017

Fly Your Freak Flag


On Saturdays and Sundays, I relax and unwind from a long work-week by puttering in my art journal. Collage seems to be one of the most therapeutic art forms for me. I pull out items from my drawers and shoeboxes that, at that moment, speak to me. Some days earth tones call to me, sometimes bright vibrant colors and shapes.

A few weekends ago, pink called my name. One item in particular was a pretty napkin that was tucked into an envelope full of Paris-themed ATCs. I decided to use it as a background. It seemed to clash with the other pink tidbits that I had piled on my work table, but I pushed ahead anyway. I also used a pink carnation printout that was gifted to me from Kelly Kilmer when I took a class a few years ago. I had been holding on to it, waiting to find just the right collage to use it in, and decided that I had waited long enough so I used it in the center of the page.

When my pink collage was done, it looked kind of yucky. I had mixed the napkin with some old dictionary pages, a pink argyle piece of washi tape packaging, fabric scraps and paper scraps. I put the collage page aside and left it for a while. Something wasn't working but I couldn't put my finger on what exactly went wrong.
The unfinished, too pink collage page
The next weekend I was playing with some Jane Davenport washi tape facial features. I had been waiting almost a year for my local Michaels to restock the tape and was so happy to find it. I made some peculiar faces and dolls with the tape, and one face with oversized eyes looked freaky-wonderful, but I didn't quite know what to do with it.

The face was too big for a paper doll, so I auditioned her on the loud pink collage page, and it seemed to work, but I decided that I needed to knock back some of the brightness of the collage with white paint and gesso. I also added Gwen's Ornamental Petals stencil/mask in a few places in the background for a subtle texture. It looked better...but not done. I decided that the page was already looking pretty strange, so I decided to try adding some Dresden Trim. One extra-large gold wing seemed to suit my girl, and a tiny gold Bourbon Crown added a touch more of whimsy. I liked the weird proportions of the giant wing versus teeny crown, with the round head and oversized eyes. I thought about giving her a second wing but she looked like she could fly with just one.
An oversized face, gold wing and tiny crown, background stenciling,
and white body suited the overly pink collage background
Still, the page didn't seem done. It was too clean, and too pink, so I decided to add contrast with a Scribe All black watercolor pencil. I added a little hair, some chin definition, and gray tones around the figure and in the background, which brought out the stamped design nicely.

It occurred to me that she looked decidedly freaky, and that she seemed to make no excuses for her oddity. The words "fly your freak flag" popped into my head so I wrote them big and bold on the page. Even with just one giant wing, she is certainly ready to fly, and not afraid to be a little unusual.

The words "fly your freak flag" popped into my head as I was finishing the journal page
If you like the German Dresden Trim wings and crown, take a look on the website to see Gwen's amazing collection of Dresden items. While made of paper--not actual metal, they are strong and flexible, hold their shine and have fine details. And here's a coupon you can use for a discount until the end of the year for Dresden Trim and/or German and English Scrap. Happy shopping, happy New Year, and happy creating!


Friday, September 29, 2017

Earth Angel Warrior: A Modern Paper Doll


The things that made us happy in our childhood, when rediscovered as an adult, can be very healing and therapeutic. For me, one of the most joyful childhood pursuits was paper dolls. The fun was two-fold: they were imaginary friends that I could play with and create stories about, and they usually had a wonderful wardrobe—the kind I dreamed about owning or designing.

As an adult, I have rediscovered the simple joy of making paper dolls. Now my paper dolls are art dolls, with crazy hats, crowns, shoes, mismatched clothing, odd heads, and often wearing wings to help them soar. I search the Internet for paper doll templates and royalty-free vintage paper doll images, combining them with my own faces, fashions and magazine advertising images. I relax and become a child again when I putter with my boxes of doll arms, legs, bodies, clothing and heads.

For my latest doll, which I call the Earth Angel Warrior, I started with pre-cut doll pattern from Retro CafĂ© Arts. Some time ago I purchased (and used) their chipboard doll, but I saved the leftover cutout/negative space to possibly use as a template. I flipped over a piece of Gwen Lafleur’s gorgeous Florentine paper (which I had already glued to cardstock to give it extra strength for doll-making), then traced the arm, leg and body sections, then carefully cut out the parts.

Doll template, Florentine paper, and other supplies.
Body parts were traced on the back of the cardstock/Florentine paper.
Front of legs on left, back of legs on right.
The basic paper doll parts, made with Florentine paper.
Next, I searched through my boxes of scrap paper and doll parts and “auditioned” different elements. I also looked at Gwen’s downloadable “wondrous wings" PDF to see what caught my eye. I knew my doll would need wings, and I tried several of them, settling on some eagle wings. I sifted through my box of doll faces and found a model’s head from a magazine advertising photo which spoke to me. I also found a little piece of an orange mailing envelope and decided to use it for the torso.

I sorted through my collection of doll heads, hand painted faces and magazine photos.
The face and wings were gray-scale, and I felt they needed a bit of color, so I enhanced them with TomBow brush tipped markers and chalks. I added royalty-free vintage boots from The Graphics Fairy, and an upside-down butterfly from Gwen’s PDF for a hat, an idea inspired by artist Mary Jane Chadbourne.
The doll parts placed together, but not yet attached.
The grayscale wings and face, as well as the monochromatic butterfly,
got a color boost with TomBow markers and pastel chalk.
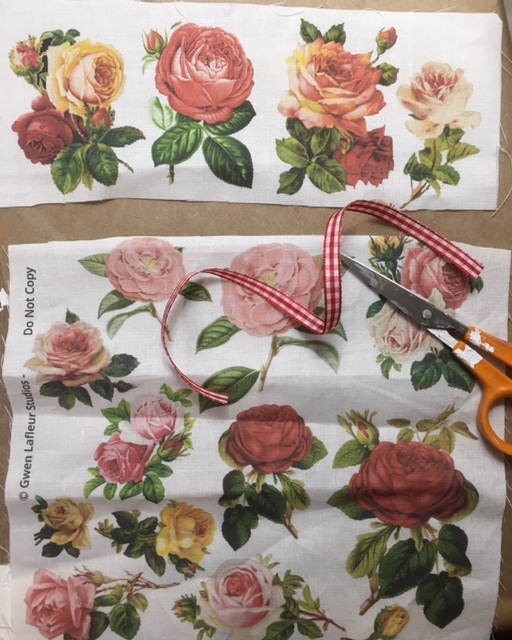
My inner fashion designer decided she needed a skirt. I printed one of the “fabulous florals” PDFs on cotton fabric, then cut a strip, stitched across the top, and pulled the strings to gather it to suggest a skirt.

To print on fabric from an inkjet printer, here’s what you do:
  • 1-Cut a section of cotton fabric about 9” x 12” and iron so it is wrinkle-free
  • 2- cut a piece of freezer paper about the same size
  • 3-place the shiny side of the freezer wrap against the wrong side of the fabric and iron until they fuse and are flat and wrinkle-free (do not use steam)
Freezer paper was ironed on to white cotton fabric in preparation for printing.
After the fabric and freezer paper were fused with an iron, it was cut to 8.5" x 11"
  • 4-using a cutting mat, metal ruler and sharp exacto knife or rotary fabric cutter, trim to exactly 8.5” x 11” so it is the size of a piece of paper.
  • 5-snip off a tiny bit at top left and right corners. This will help the fabric pull through the printer without jamming.

Snipping a tiny bit from the top corners helps the fabric feed through an inkjet printer without jamming.
  • 6-test your printer to see whether to place fabric face down or face up in the printer
  • 7-select the design you want, press print, and it should emerge from your printer
  • 8-peel the freezer paper away, and you will have the printed cloth. If desired, iron the fabric to help set the design and prevent running or fading.
Gently peel the paper from the printed fabric after it comes through the printer.
Two of Gwen's downloadable pdfs were printed on fabric.
For the doll’s skirt, I chose a section about 4” x 8.5”. Rather than keeping the skirt flat, I decided to gather the top to add some dimension. I also added, using a glue stick, a little checkered ribbon at the bottom. Glue sticks are great when using fabric with paper because they don’t stiffen the fabric or cause discoloration. I also added a little rust-colored piece of Gwen’s sari silk ribbon as a belt, which also covered up the stitches at the skirt’s top.

The top few inches of the rose-printed fabric was cut for use as a doll skirt.
Close-up of the skirt fabric, with stitching at top (to be gathered) and gingham ribbon at bottom.
The skirt was gathered at the top and fit to the doll's waist, then glued in place.
The finishing touch was a belt of Gwen's orange sari silk ribbon.
Mini brads were used to connect the body parts and enable the doll to be posed.
The final step was putting all the pieces together. Unlike traditional paper dolls that don’t have moveable parts, and have ineffective little tabs to hold the clothing on, I like to use mini brads to assemble my dolls. With an awl, I hold the pieces in place, then gentle poke through both layers to form a hold. Brads come in many shapes and sizes (like and can be subtle, or used as another design element.

The finished Earth Angel Warrior paper doll, with flora & fauna elements.

When all the elements were put together and I saw the finished doll, I realized that she was made of flora and fauna elements—with the bird wings, butterfly hat and rose skirt. While her face wasn’t traditionally pretty, it looked fierce, confident and interesting, and she seemed like a warrior. So, I decided to call her my Earth Angel Warrior. As a finishing touch, and to echo the flora/fauna theme, I put a feather in her hat and another in her hand.


 We are doing a Gwen Lafluer Artisttribe BlogHop!

One lucky winner will receive $20 Gift Card to the Shop at Gwen Lafleur Studios! All you need to do to enter is leave a comment on any or all of the blog posts during the hop - the more blogs you comment on, the more chances you have to win! (One comment per person per blog please.)
You have until Sunday, October 1st at 11:59 p.m. mountain time to leave your comments. The winner will be announced on the Gwen Lafleur Studios Facebook page (http://www.facebook.com/GwenLafleurStudios) on Monday, October 2nd.

Please visit the blogs of the other Artisttribe bloghop participants:

_____________________________________________________________________________ 
  • To visit artist Mary Jane Chadbourne's website, click here
  • For the Retro Cafe Art website, click here
  • For the Graphics Fairy website of vintage downloadable images, click here