Showing posts with label faux lace. Show all posts

Friday, December 8, 2017

Holiday Gift Tags


Tags are a quick and easy way to add a personal touch to a package. I recently made several sets of holiday tags to spiff up the gifts that will be soon under the tree in the Wyatt living room. The three groups of tags that emerged were all quite different--from girly and romantic, to masculine/traditional, to black and white graphic patterns.

The first set was the girly/romantic group. The German and English scrap angels really called to my inner-frilly side. One of the techniques that I return to time and again is using printed teabags in my artwork. When I saw the German and English scrap angels on Gwen's website, I immediately knew that--combined with printed teabags--they would be perfect for some holiday tag-making.

Scrap angels, blank tags, and printed teabags
I gathered some dry, empty teabags and, with some white acrylic, used some of Gwen's beautiful wood blocks to print the bags. (For a step by step tutorial on my "faux lace" process using teabags, click here)

A standard-size blank tag, and an oversized chipboard tag
Gluesticks work well for adhering the teabags to the base paper
Various laces and ribbons from my stash were
auditioned to see what went best with the printed teabags
An English Scrap Angel was "auditioned" for a standard-size tag

Before being glued, a carefully trimmed German Scrap Angel,
printed teabag and lace scrap were "auditioned" for a large tag

For a more masculine look, I chose some festive red and gold marbled paper from Gwen's sample pack, and combined it with a scrap of commercial scrapbook paper, a bit of polka-dot ribbon and one of the gorgeous Dresden Medium Medallions for a simple, yet striking tag.

A Comet Medallion was "auditioned" for the tag
to see how it looked with the marble paper and ribbon
Since layers of paper covered the tag's hole, an awl was used to poke a new hole in the tag
The medium medallion was attached with a large brass brad, and black words,
printed on clear mailing labels, were added
This close-up shows the mini brads that were added for a decorative touch under the inspirational holiday words
The next weekend, I was tired of red and green and obvious holiday themes and decided to see how some of Gwen's stencils would work in black and white for a holiday look. I painted some tags with white gesso, and others with black gesso. Some black and white gingham ribbon set the designs off nicely. On the tags below, I used both Gwen's cardinal stencil and Ornamental Petal stencil/mask with white paint on a black background.
White stencils and white gel pen on black painted tags
On the tags below that were painted white, I used a wedge cosmetic sponge and small dabber tool with a black stamp pad to print the holly section of the cardinal and holly stencil. Although it is not officially a holiday stencil, the Decorative Medallion stencil reminded me of a snowflake so I used that also. I added a few words here and there with either a black or white gel pen. Since I am not always perfect at stenciling, I fixed the places that were too sketchy or light with either a black gel pen, white gel pen,  and white or black paint on a tiny brush.

Holiday words were added to the stenciled tags using a black gel pen
I usually write the recipient's name on the back of the tag to keep the front looking festive. Now all I need to do is finish my holiday shopping so I have some gifts to wrap up and tie the tags onto!

During the month of December, you can save on German Dresden Trim and German and English Scrap using the code on the coupon below. There's still plenty of time to order so that you can create your own gift tags, cards, wrapping paper or other festive gift items!


Friday, September 8, 2017

Tea Rose Khadi Journal


Shabby-chic faux-lace tea and roses Khadi journal cover
It's not easy to find the perfect art journal--you have to consider the size, shape, weight, and most important--the kind of paper. Lately I have been loving square journals. Maybe it's the influence of Instagram, with it's square format, or maybe it is just that I am a true Virgo and love all things neat and regular.

When I saw the Khadi art journal on Gwen Lafleur's website, it called my name. Not only is the shape, size and weight perfect, but the paper is high quality, handmade watercolor paper.

unadorned Khadi journal
The blank pages stared back at me. Putting the first mark on a new journal is a little scary--it makes a statement, sets your mood for future pages. I decided to go with one of my favorite techniques for the cover: printed teabags. I use teabags a lot in my art. They give plain white paper a quick and effective aged effect. When I use stamps on them (with white printmaking paint) the effect is of aged lace...I call it "faux lace."

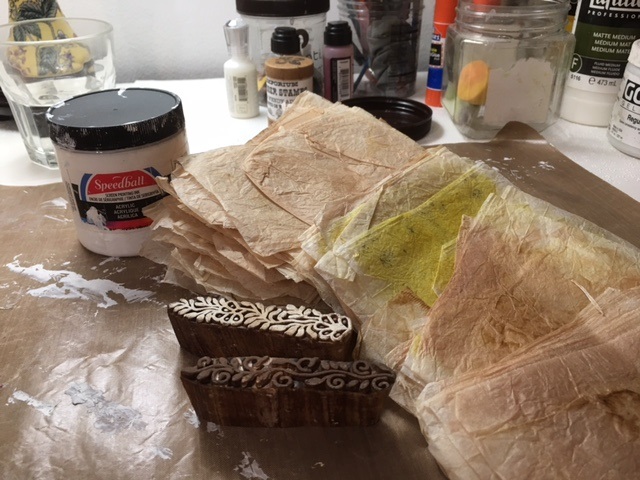
Mini border wood blocks, teabags and printmaking paint
I gathered my supplies for the project: a collection of dried, empty, open teabags, my favorite white printmaking paint, and two of Gwen's woodblock mini border stamps. (Be sure that the teabags are brewed plain--add your sweetener, milk or lemon AFTER you have removed the teabags.) For this project, I used a combination of Earl Grey and plain Lipton tea. (Teas with rose hips gives the paper a nice pink color, and ones with turmeric are a beautiful yellow.)

Two mini border woodblock stamps, with white printmaking paint applied to one stamp.
First, I painted the stamp with white printmaking paint. Next, I draped the teabag over the stamp and gently pressed until the design showed through, then carefully peeled away the printed teabag. (For teabags, this method works better than flipping the block and stamping onto the paper.) Periodically I used a baby wipe to remove the paint from my fingers. Since the teabags are very thin, the paint seeps through a bit, so clean hands lessen the chance of smudges.

Above, the teabag has been gently pulled off the stamp, revealing the print on the right.
Below is the group of printed teabags that I used for this project. I tried my mini border stamps in all over patterns, stripes, alone, as a border around a teabag, in a fan shape, and in the center of some of the smaller teabags. (If you would like to read more about printing teabags to create "faux lace", there is a tutorial on my blog and the link is here.)


Once they dried, it was time to get started thinking about the arrangement. I fiddled with them until I found a design I liked, and took a quick photo with my iPhone. Next, I set about adhering the printed teabags to the Khadi journal cover.

First I spread a thin layer of Liquitex matte medium all over the cover with a credit card. (I keep a container or baby wipes handy to wipe the excess off my credit card as well as my fingers. I also like to use a non-stick surface under my project.)


I added each printed bag one at a time, smoothing it out with the credit card and occasionally with my fingers, and overlapping them a little, then adding some extra matte medium on top, which I smoothed out with a credit card. I used my heat gun to speed up the drying process.

The first teabag has been placed on the journal cover, with a dollop of matte medium waiting to be spread on top.
This is the journal cover about half way through the process of gluing on the teabags.
The last, and center, printed teabag has been placed, and a squirt of matte medium will be spread on top.
When the printed teabags were all in place, it was time to think about embellishment. I tried out a few ideas, and decided on using some roses from Gwen's downloadable pdf. I selected a few, and "auditioned" them for placement on the cover. The roses looked sweet and went well with the vintage effect.


I decided that the background was too stark white, and needed to be aged to go with the vintage look of the teabags. So, here's what I did: first, I gently tore the edges of the paper, because a torn edge is softer than a cut edge, and I was going for a soft, feminine, vintage look. Then I rubbed on some antique linen Distress Stain, intentionally making the white areas blotchy and uneven, and bringing the stain up into some of the flower petals. Last, I took a mini dabber and applied some sepia distress ink and archival ink to the edges and here and there on the white paper.

Then I decided where to arrange the flowers on the cover, and used a glue stick to adhere them. Since I had printed the roses with an ink jet printer, I was worried that the Liquitex matte medium would be too wet and the roses might run and bleed.


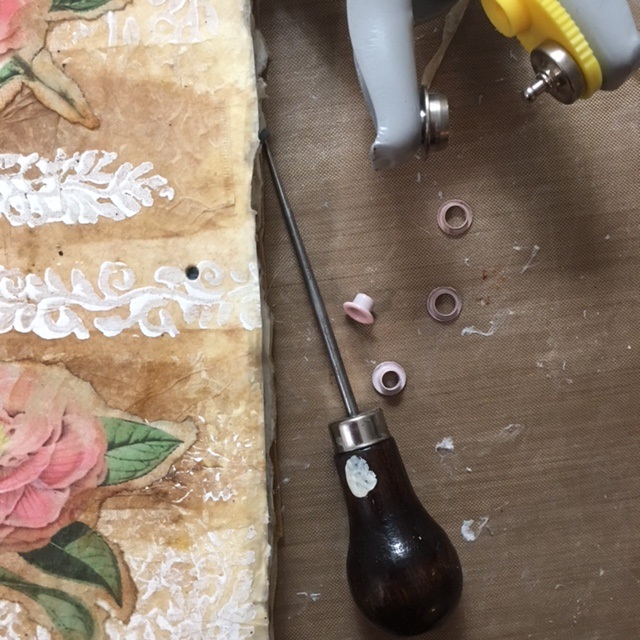
I was almost done, but I needed a closure of some kind. After some thought, I decided to use grommets and ribbon. With an awl, I poked a hole near the center right edge of the cover, then snipped it a little more to be just about the size of the grommet. I inserted the little pink grommet in the hole, pushed the smaller part onto the back, arranged my grommet tool over the pieces, and squeezed to secure it.


 For the back of the journal, I used plain teabags. I put a pink grommet midway down the left side of the back of the journal. After "auditioning" several kinds of ribbon and fiber, I settled on some pink and green dotted ribbon that had been in my "stash" for years. It was just the right shade of pink, and the green was a pretty good match with the rose leaves.

Here is the finished journal, open:


...and here is the finished journal closed and tied. When I look at the journal, it evokes a nostalgic feeling, and reminds me of my grandmother and the flowers growing around her old country farmhouse, and brings back happy childhood memories.


Saturday, June 27, 2015

Tutorial: Faux Lace from Recycled Tea Bags


-ATC Box with paisley stamped tea bag faux-lace,
lace trim and gold dotted accents-
 
Tired of spending a lot of money on art supplies? Here’s a frugal way to recycle and make some cool art and craft.
1)      Save your used teabags. Pull them out of the water BEFORE you add milk, sugar, honey, lemon or any other flavor-enhancer.
 
-figure A-
 
2)      When the bags are completely dry, carefully open them and remove the dried leaves. (The paper is very delicate.) [A]

3)      Flatten out the paper. You will see mottling/staining—that’s part of the fun. Paper will be different colors depending on what kind of tea you use and how long you steep it. [B]
 
-figure B-
 
4)      Choose a variety of stamps—I prefer lacey feminine ones with good detail. You will need to experiment to see what you like best. You can also use hand-carved stamps and/or wooden stamps. [C1, C2]
 
-figure C1, hand carved stamps-
 
-figure C2, commercial stamps-
 
5)      Apply white printmaking paint to the stamp. You can brush it on or use a brayer. (Printmaking paint stays wet longer than other paints.) [D]
-figure D-
6)      Drape the teabag over the stamp and gently press it down all over. [E]
 
-figure E-
 
7)      Gently pull the paper off the stamp. If it didn’t print perfectly, don’t worry…it can often add textural interest to have an imperfect stamp. (I use the imperfect ones for collage and the “perfect ones” for ATCs and tags.) [F1, F2]
 
-figure F1 shows the printed tea bag as it is pulled away from the stamp-

-figure F2-
 
8)      Drape the empty sections of the teabag over the stamp and press. (You will probably get paint on your fingertips. I keep a wet paper towel or rag nearby to wipe my fingers as I work.) I usually reapply paint every other time.

9)      Keep filling in sections until the whole teabag is covered. You can also mix stamps—you don’t have to use the same stamp on each teabag. [G1]

10)   Once the painted bags are dry, you can make all kinds of things with them:

a.       Collage them into one big piece and use it as a journal page or background for other artwork [G1, G2]
 
-figure G1-

-figure G2 has a tea bag lace background overlaid with a
vintage wedding photo printed on sheer silk, with lace and
button trim-
 
b.      Cover a small box with it and decorate with lace (atc box). Be sure to cover box with white gesso first (and let dry) so that the nuances of the printed tea bags show up. [H]. I often use recycled boxes but this one was purchased from Retro Café Arts.
 
c.       Wrap it around an ATC or tag for a base. You can also layer it over a colored paper or fabric background [I1-I5]
 
-figure I1-

-figure I2-

-figure I3-

-figure I4-
 
-figure I5-
 
d.      Scan the design into a photo editing program and manipulate or mix with other images to create very personal art or background papers. [J1-J4]
-figure J1-

-figure J2-
-figure J3-

-figure J4-

e.      Use it as “skin” or a base of a Santos cage on an arty paper doll [K1-K6]

-figure K1-
-figure K2-
-figure K3 used a Dina Wakley stamp face,
Graphics Fairy shoes and tea bag lace arms-


-figure K4 uses faux tea bag lace on a large paper doll template from
Retro Café Arts-
 
-figure K5 has a tea bag faux lace base and arms
with Graphics Fairy wings and face-
 
-figure K6 has faux lace arms and legs, an original face
hat made from a recycled, painted coffee filter and
Graphics Fairy butterflies -