Showing posts with label teabag. Show all posts

Saturday, July 7, 2018

Stencil Club: A Tuscan Summer Day

Over the past few years, I've gotten hooked on stencils. At first, I thought stencils were something that had to be traced carefully and filled in with color. I thought they would give a stiff, boring look to my artwork. After taking some workshops and watching videos on how to use stencils, I discovered that they were pretty magical.

One of my friends told me about the Stencil Club, which has exclusive designs by some of the top artists of Stencil Girl. Each month, you get three different sized stencils by the same artist plus a video and membership in their closed Facebook group. The Stencil Club designs are not for sale to the public; they are available only to club members.

I decided to give the Stencil Club a try, and as luck would have it, this month's artist is one of my favorites: Gwen Lafluer. When the stencils arrived, I pulled out some of my favorite supplies and got to work.
The tile-inspired designs made me think of an old country home in Tuscany...not that I have ever been there, but I can dream, can't I? I pictured warm golden colors and sunlight and charmingly aged floors and walls. For the background of my journal page, I decided to use a base of turmeric teabags with the biggest stencil (9"x12") done in white.
Dried, empty turmeric teabags ready to be glued to a journal page.
I got to work spreading matte medium on the blank page with an old credit card, placing on the teabags, adding more matte medium on top, and scraping off the excess.
The first row of teabags was applied to the wet, matte medium covered page.
Eight turmeric teabags covered the page perfectly.
Little pieces that were snipped off the top of the teabag (so that it could be emptied) add interest to the background.
White acrylic was applied through the stencil with a makeup sponge.
Once the white paint had dried, I carefully applied VersaMark on top of the 6'x6"stencil, sprinkled on some of my Emerald Creek Baked Texture embossing powder in chunky rust, removed the stencil, tapped off the excess powder, then blasted it with my heat gun. The rust, white and turmeric colors  were perfect together. (I was having such a good time and so far into my "zone" that I forgot to take photos.)

It needed a little more oomph, so I searched through my boxes of ephemera to find just the right item that said 'Tuscan kitchen on a sunny, relaxed day' and auditioned a bunch of items. I finally settled on some birds that I cut from les Oiseaux, a beautiful Florentine paper available on Gwen's website. I carefully tore the birds out of the paper, added antique linen Distress Stain to age them, and edged them with a touch of brown chalk ink. Next, I used gel medium to adhere the birds to the page.
Birds were cut from the gorgeous les Oiseaux Florentine paper.
I was feeling like the page should hint at a window, so I added an edging, at the bottom, of one of Gwen's Art Deco Border designs to suggest the window ledge. Again I used the VersaMark, but this time I sprinkled champagne-gold embossing powder. As final touches, I added small white sections of the fluer de lis, a little gold on  the tips of the the rusty fluer de lis, and with my fingertip, a bit of yellow ochre paint to blend the birds into the background.

I am so glad I took the plunge and joined the Stencil Club! I want to spend the whole weekend playing with the new Stencil Club stencils, which I am sure are going to be among my favorites. I can't wait to see what interesting stencils arrive in the months to come!
"A Tuscan Summer Day" journal page

Friday, July 6, 2018

Turmeric Flip Journal


A lot of artists are hoarders--not the kind on television that need intervention--but we are savers of bits and pieces of pretty things. Sometimes we save ugly things because they are just so very interesting. We save pieces of pretty paper, yarn, fabric, metal, rocks, sticks and weird stuff from garage sales.

One of the many things I save is teabags--used, dried, and emptied of their contents. They add a nice vintage look to a page. (You can see some of my past creations here and here.) My husband recently switched to turmeric tea, and I loved the golden color of the bags, so he started saving them for me. (Is he a good husband or what?!)


Like many, I have boxes and drawers full of unfinished artworks. It turned out that a lot of them were 6"x6"...probably because that is the size of my geli plate. I decided to use the scraps up and put them in a journal.
These are some of the leftover hoarded and unfinished artwork that became book pages.
The center pages were part of a card I received from artist Jeanne Draachreider.
Recently an artist posted a journal she made that had a simple ring closure. So simple. So efficient. I loved it. I ran out to my local office supply store and snagged a package.

One of the problems with most bound journals is that once you start adding layers to a page, it gets fatter and fatter and eventually won't close. Often some of the back pages go unused because the journal just can't hold any more. Some people remove every other page, but that seems tedious and wasteful. A ring-bound flip journal seemed like a perfect solution to the "fat journal" problem.

 
First, I tried out the ring on my Index Card of the Day collection. I loved it. The cards flipped easily, and I could add and subtract pages without a problem. The cover was made of leftovers from a mermaid doll project.

I used some of Gwen's stencils in shades of blue and green as the base for the fins, and also used some of the embellishments from silk sari scraps plus a seahorse and starfish from the downloadable Stupendous Sea Life collection and a few Turkmen jewelry parts.

The dolls I made for my art doll trade group came out great too. Below are a few of them.
I wanted the turmeric journal to be a little more elegant than the Index Card of the Day flip book, so I decided to make the cover one continuous piece, with an inch or two for a spine, and have two rings. I got to work, cutting watercolor paper, smearing (with the side of an old credit card) matte medium on the paper, and layering the teabags. I was in my zone, working madly and happily like an elf at Christmas.


I especially liked the imperfections of the tea stains and the unevenness of the shapes where the teabags overlapped. I also liked the little snippets that were cut off so that the tea could be removed from the bag.

I criss-crossed the small strips on the book spine to enhance the rustic effect.
The wet spine of the book, with tea bag end strips forming loose crosses.
I left some of the pages with only the teabags. For others, I covered them with the geliplate prints and other small, unfinished artwork.

On some, I had to experiment with a new mandala stencil of Gwen's from the Boho Collection, and tried it several ways.


When everything was dry, I punched holes in the pages. For the holes on the front and back cover, I added some grommets for strength.

I tried out a some of Gwen's Fabulous Floral Embellished Trim on the cover as well as some of the German Dresden Trim, but they were too fancy with the utilitarian ring closure.
The sea-green and gold trim was pretty with the cover, but didn't work with the ring closure.
The Dresden Trim accent was gorgeous with the turmeric teabags, but the rings looked clunky next to it.
I loved the new mandala stencil so much I used it on the book cover with some of Seth Apter's Emerald Creek Radiant Rust embossing powder.

When I put all the pages together and attached the rings, it looked great. The circular design complimented the ring closure and the little grommets, and the warm rust effect went nicely with the turmeric's golden color.
 
So far, so good--but there was a problem. The journal didn't flip very well. The spine of the cover prevented the pages from laying flat, and the curve of the ring also inhibited the page-turning.
This page has a StencilGirl design by Andrea Matus DeMeng done in Deep Sea Baked Texture Embossing Powder.
This page has a StencilGirl design called Lacy Lotus, by Jessica Sporn.
The left page has a Damask design by Michelle Ward  printed on deli paper.
I tried some substitutes for the rings. A fiber closure was a fail. I tried some jewelry pins with wire twisted through both ends...also a fail. I tried taking apart a D-ring but the metal was too difficult to bend and even if I had been able to get the pages on the straight part of the ring, I wouldn't be able to open and close it.
 
 
I decided to go with function over beauty, and cut all my pages, as well as the cover and spine, apart. Now the pages flipped perfectly and the book would open completely and lay flat.

To finish, I dangled some of my favorite Turkmen jewelry parts on the rings. They go nicely with the rustic look of the turmeric teabags, and add a sweet, soothing tinkling sound. This just may be my new favorite journal!
The new journal, open flat, showing the back (left) and front (right)
A side view of the Turmeric Flip Journal
The finished Turmeric Flip Journal, with Turkmen jewelry parts dangling from the ring closures.


Friday, September 8, 2017

Tea Rose Khadi Journal


Shabby-chic faux-lace tea and roses Khadi journal cover
It's not easy to find the perfect art journal--you have to consider the size, shape, weight, and most important--the kind of paper. Lately I have been loving square journals. Maybe it's the influence of Instagram, with it's square format, or maybe it is just that I am a true Virgo and love all things neat and regular.

When I saw the Khadi art journal on Gwen Lafleur's website, it called my name. Not only is the shape, size and weight perfect, but the paper is high quality, handmade watercolor paper.

unadorned Khadi journal
The blank pages stared back at me. Putting the first mark on a new journal is a little scary--it makes a statement, sets your mood for future pages. I decided to go with one of my favorite techniques for the cover: printed teabags. I use teabags a lot in my art. They give plain white paper a quick and effective aged effect. When I use stamps on them (with white printmaking paint) the effect is of aged lace...I call it "faux lace."

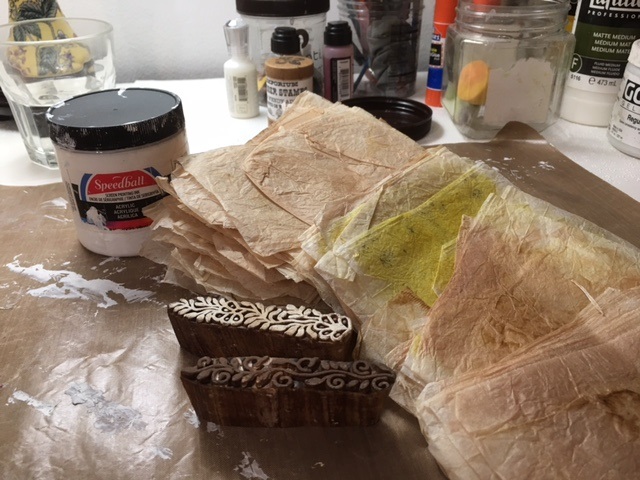
Mini border wood blocks, teabags and printmaking paint
I gathered my supplies for the project: a collection of dried, empty, open teabags, my favorite white printmaking paint, and two of Gwen's woodblock mini border stamps. (Be sure that the teabags are brewed plain--add your sweetener, milk or lemon AFTER you have removed the teabags.) For this project, I used a combination of Earl Grey and plain Lipton tea. (Teas with rose hips gives the paper a nice pink color, and ones with turmeric are a beautiful yellow.)

Two mini border woodblock stamps, with white printmaking paint applied to one stamp.
First, I painted the stamp with white printmaking paint. Next, I draped the teabag over the stamp and gently pressed until the design showed through, then carefully peeled away the printed teabag. (For teabags, this method works better than flipping the block and stamping onto the paper.) Periodically I used a baby wipe to remove the paint from my fingers. Since the teabags are very thin, the paint seeps through a bit, so clean hands lessen the chance of smudges.

Above, the teabag has been gently pulled off the stamp, revealing the print on the right.
Below is the group of printed teabags that I used for this project. I tried my mini border stamps in all over patterns, stripes, alone, as a border around a teabag, in a fan shape, and in the center of some of the smaller teabags. (If you would like to read more about printing teabags to create "faux lace", there is a tutorial on my blog and the link is here.)


Once they dried, it was time to get started thinking about the arrangement. I fiddled with them until I found a design I liked, and took a quick photo with my iPhone. Next, I set about adhering the printed teabags to the Khadi journal cover.

First I spread a thin layer of Liquitex matte medium all over the cover with a credit card. (I keep a container or baby wipes handy to wipe the excess off my credit card as well as my fingers. I also like to use a non-stick surface under my project.)


I added each printed bag one at a time, smoothing it out with the credit card and occasionally with my fingers, and overlapping them a little, then adding some extra matte medium on top, which I smoothed out with a credit card. I used my heat gun to speed up the drying process.

The first teabag has been placed on the journal cover, with a dollop of matte medium waiting to be spread on top.
This is the journal cover about half way through the process of gluing on the teabags.
The last, and center, printed teabag has been placed, and a squirt of matte medium will be spread on top.
When the printed teabags were all in place, it was time to think about embellishment. I tried out a few ideas, and decided on using some roses from Gwen's downloadable pdf. I selected a few, and "auditioned" them for placement on the cover. The roses looked sweet and went well with the vintage effect.


I decided that the background was too stark white, and needed to be aged to go with the vintage look of the teabags. So, here's what I did: first, I gently tore the edges of the paper, because a torn edge is softer than a cut edge, and I was going for a soft, feminine, vintage look. Then I rubbed on some antique linen Distress Stain, intentionally making the white areas blotchy and uneven, and bringing the stain up into some of the flower petals. Last, I took a mini dabber and applied some sepia distress ink and archival ink to the edges and here and there on the white paper.

Then I decided where to arrange the flowers on the cover, and used a glue stick to adhere them. Since I had printed the roses with an ink jet printer, I was worried that the Liquitex matte medium would be too wet and the roses might run and bleed.


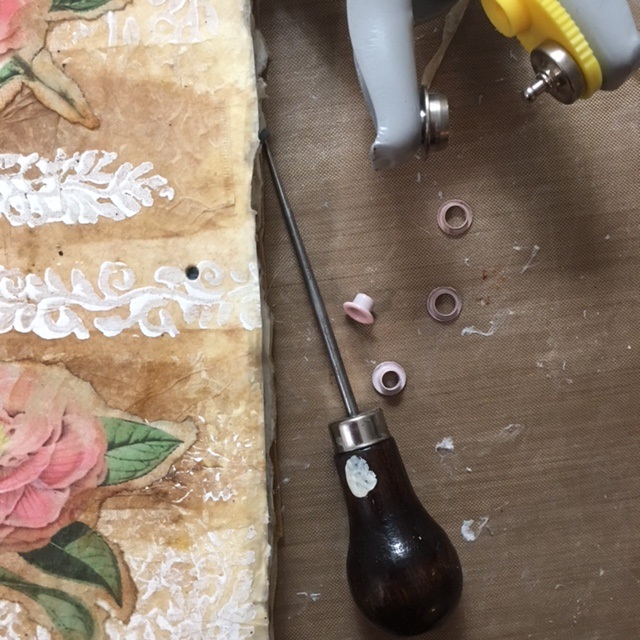
I was almost done, but I needed a closure of some kind. After some thought, I decided to use grommets and ribbon. With an awl, I poked a hole near the center right edge of the cover, then snipped it a little more to be just about the size of the grommet. I inserted the little pink grommet in the hole, pushed the smaller part onto the back, arranged my grommet tool over the pieces, and squeezed to secure it.


 For the back of the journal, I used plain teabags. I put a pink grommet midway down the left side of the back of the journal. After "auditioning" several kinds of ribbon and fiber, I settled on some pink and green dotted ribbon that had been in my "stash" for years. It was just the right shade of pink, and the green was a pretty good match with the rose leaves.

Here is the finished journal, open:


...and here is the finished journal closed and tied. When I look at the journal, it evokes a nostalgic feeling, and reminds me of my grandmother and the flowers growing around her old country farmhouse, and brings back happy childhood memories.