
Jewelry made from StencilGirl® designs? And embossed onto painted a Lutradur surface that looks surprisingly like leather? Yes and Yes!
While rummaging in an old box of unfinished art quilts, I stumbled upon pieces of a half-finished project made with painted Lutradur and Tyvek. About five years ago, I had a vision of using strips of black and white harlequin painted Lutradur along the edges of my painted Tyvek design. The project never quite worked out, so I decided to try stenciling over the Lutradur to see what would happen. It had been years since I worked with Lutradur, a non-woven fabric that is often used in furniture construction and has been embraced by crafters.
 |
| Using a Versamark stamp pad through a stencil, the embossing powder looked perfect before heating. |
 |
| Once I blasted the design with a heat gun, the unpainted (white) Lutradur melted. The areas painted with black gesso, however, were perfectly intact. |

I set about stenciling some of my favorite StencilGirl® design on the black strips of painted Lutradur. I had a vision of making a cuff bracelet. I combined one of Jill McDowell's circular Japanese-inspired Crest stencils with a cross from Laurie Milka's Pilgrimage to the Renaissance.


The painted Lutradur was a little scratchy, so I also cut some black felt (to use as a lining) to the same size. After some deliberation, I selected a decorative stitch on my sewing machine and carefully stitched along all edges.


 |
| The finished, stitched cuff. |

 |
| The finished cuff is easy to put on and take off with the Velcro closure. |
I was pretty excite about the success of the cuff bracelet, so I decided to make more jewelry. (It was kind of addictive!)
I used another one of Jill's Crest medallions for a pendant. I made two, and glued them together with Golden heavy gel gloss. I used Jill's full 2.5" circle as a template, traced around it with a pencil, and cut each shape so they would match perfectly. A small hole was punched with an awl, and a small jewelry ring inserted through the hole. I hung it from a piece of black cording that I found at my local bead store.


 |
| Clips held the two sides together while the glue dried. Be sure to cover the edges with waxed paper or parchment paper so the clip doesn't stick to the surface. |


 |
| Each earring shape was carefully cut out with small, sharp scissors. |
 |
| I used a piece of wood behind the stenciled Lutradur to avoid poking holes in my worktable. |
 |
| Two sets of the finished earrings. |
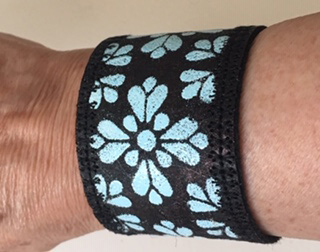
I decided to make a more delicate, feminine cuff with a floral shape using pale blue embossing powder. I chose a section of Laurie Milka's Pilgrimage to Mexico. I tried adding white dots to the edges but they smeared so I used only the blue area. After trimming away the excess, I cut a piece of black felt for a lining, and used a machine stitched floral design along the edges. Again, I used Velcro for the closure.

Last, I took some triangular shapes from Laurie Milka's Pilgrimage to India, cut them carefully, and attached them to wide black grosgrain ribbon with Golden heavy gel gloss and brass brads.

 |
| Each diamond was backed with black felt. |


Here are all the embossed design that I experimented with. A few of the embossed shapes are being saved for future projects.

Finally, here's the finished collection of my handmade, faux-leather jewelry, ready to be worn.

Tips:
* Lutradur is fibrous, so if it is humid, extra embossing powder can stick where you don't want it. The excess powder can be brushed away with a fine paintbrush before heating.
* Any extra embossed powder that ends up in the wrong place can be covered over with a black sharpie.
* It doesn't really matter if your embossing powder isn't perfect; the edges are going to be trimmed away so only the center of the design shows.
Stencils used:
Laurie Milka, Pilgrimage to Mexico Stencil
Laurie Milka,Pilgrimage to India
Laurie Milka,Pilgrimage to the Renaissance
Gwen Lafluer, Afraid to Try
Jill McDowell, Crests