Showing posts with label steampunk. Show all posts

Friday, April 13, 2018

Steampunk Subway Portal

Art Deco designs make me sigh with happiness. There's something so magical about Deco...so structured and mathematical, yet so curvy and fluid at the same time. The Art Deco stencils designed by Gwen Lafluer for StencilGirl capture that magic.

Like many of my art pieces, this Steampunk Portal emerged as I went along. I started with no plan other than to experiment with some of the Art Deco Stencils. I started by painting a big piece of heavy watercolor paper in one of my favorite colors--light aqua--and once it was dry, I used some molding paste through the two Art Deco Bookplate stencils. The one on the right became the piece I called "Yearn - Dare" which you can see here. The one on the left became the "Steampunk Subway Portal."
Gwen's Deco Bookplate stencil pair was printed with molding paste onto a painted aqua background.
My worktable, covered with various deco stencils and prints.
The effect of the white molding paste on the aqua background was pretty, but I knew it needed more. So, I took out my Derwent Inktense Blocks and added more color. They go on like a chalky crayon, but when you add water, the colors pop, intensify, melt, blend and get really delicious.
The first few strokes of Derwent Inktense Blocks were applied to the painted, stenciled design.
Once water was added, the Inktense colors intensified.
More color was added with the Inktense blocks until the design was ready for embellishment.
I added shades of indigo and moss green and brown until I had an effect I liked. Then I set about deciding how to embellish the background. I had a set of Tim Holtz compass coins that had been in my stash for about a year, and one was just the right size and color for the center circle of the design. I auditioned some of Gwen's Turkmen Jewelry Parts and Dresden Trim to see what would compliment the compass coin.
The chain was too long and the Dresden trim corner pieces too small on this "audition."
The big Dresden corners were gorgeous, but too bold for the background, and they overpowered the central elements.
A smaller piece of Turkmen jewelry was too short and bulky for the background.
 I liked the long chain with a dangling diamond-shaped end-piece, but it was a little too long. I also liked some Dresden corners that I had cut from a bigger piece of a Dresden Medallion, but they were too shiny. I decided to grunge up the gold corner pieces with Seth Apter's chalk paints, and once the paint was dry, added a layer of black ink.
A Dresden medallion was cut apart to make the deco corner fan shapes.
Chalk paints and black ink gave an aged effect to the Dresden corners.
 I felt that the Turkmen chain was too long and considered cutting it. But even if I cut it, dangling it from the center of the compass seemed too boring. I didn't really want to cut it, so I decided to anchor the coin with a large brass brad and then wrap the chain around the top of the coin. I used some thread to stitch it in place and a little heavy gel medium for extra holding power.
It seemed to need words, so I found a Rumi quote that I had printed on a clear Avery mailing label, carefully trimmed away the excess, and adhered it to the top and bottom. The words are: "Let yourself be silently drawn by the strange pull of what you really love. It will not lead you astray."

Once the words were on, I knew I was almost done, but still felt it needed more. I put away my art supplies for the night and slept on it.

The next day I was thinking about how to finish the piece, and realized it was looking pretty Steampunk. It also occurred to me that it looked like a magical door or portal. As I was riding the subway on my way home from work, I realized that a few months before I had taken a photo of the sign in the station of my new work stop--149th Street in the Bronx--and that the photo would go nicely with my work-in-progress. The colors in the photo were greenish and old, and the mosaic tiles, the design of the sign and the font--as on much of the old signage in the NYC subway system--are authentically early 20th century.
Subway sign over the tracks at the Bronx 149th Street station
I shrunk the photo down to the right size and printed it, then cropped it so only the number showed. My color printer was a little off and it looked dull printed on ordinary copy paper, so I covered the little sign with some of Seth Apter's Baked Texture Beeswax embossing powder, which greatly enhanced the image. I also edged the little sign with sepia archival ink and added a touch of Lumiere gold paint, then used heavy gel medium to adhere it to the stenciled background design. Last, I strategically added some little square brass brads, which echoed the mosaic of the subway sign and complimented the deco geometry.
I realized that the NYC subway system really is my daily portal. I get on the subway every weekday morning by going through the lobby, and then through the basement, of the gorgeous Art Deco Chrysler Building. So,  I have my "aaaah" moment of beauty twice a day as I am going to work and coming home. During my commute, I love looking at all variations in the designs and colors of the old deco tiles signs along the way, which makes what could be a long, boring ride a little more interesting.


Thursday, March 22, 2018

Well, Hello Dollies!


Dolls are dear to the hearts of  many people. As much as I love three-dimensional dolls, I have always loved paper dolls even more. I have fond memories of receiving new paper dolls on special occasions, and of seeing the Betsy McCall paper dolls in the McCalls magazines at my grandmother's house. So, it's no surprise that as an adult, I am especially enchanted with making arty paper dolls. One of my friends recently started an online art paper doll trading group, so I got to work right away.

The first theme is "artists choice," so I started rummaging through my scrap papers looking at them with a new eye to see how each scrap would translate into an arm, leg or torso. I also spent some time rifling through fashion magazines for interesting heads, printing and painting my own heads with stencils, stamps, and watercolors. My dolls usually cry out for wings and crowns, funky shoes and skirts too.
My work table with assorted doll parts and heads to choose from.
Left: Paper Doll body from Retro Cafe Arts; Right: head stamp from Lynne Perrella plus assorted body pieces.
For most of the body parts, I used a template from Retro Cafe Arts. Reprints of vintage paper doll parts are also fun to use, and available on the internet from many sources, such as The Graphics Fairy.
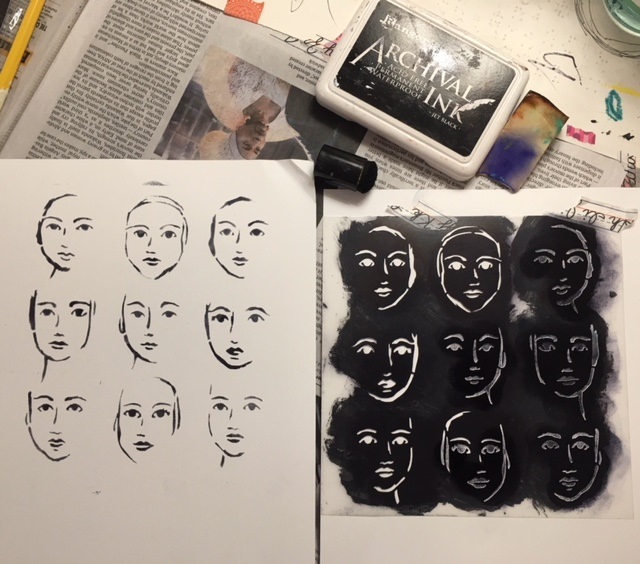
A face stencil from StencilGirl was used for some of the doll heads.
A stencil from Stencil Girl had nine heads that were just the right size for my template. I dabbed black ink through the stencil, and also flipped the stencil and made nine more.
Color was added with Derwent Inktense Blocks.
I added hair, ears, and more color to the stenciled faces.
  I added my own lines for the hair and ears. With Derwent Inktense Blocks and water-soluble colored pencils, I added details. After they dried, I carefully cut out the ones I liked best.

Some of the faces were very close together on the stencil, leaving little room for hair so those faces needed hats and crowns.
 For wings, I used a large butterfly stamp that was purchased at Ink Pad NYC. A magical effect was achieved using the stamp with Seth Apter's Baked Texture embossing powder. I used a variety of embossing powder and background colors for the wings. For more subtle dolls, I used a mini wing set and small crown stamp designed by Birgit Koopsen. German Dresden Trim Gold Bourbon Crowns from Gwen Lafluer's website topped several heads--some distressed, some left shiny.

This was a test page leftover from creating grunge-effect backgrounds painted on a recycled manila file folder. I used the left side to make butterfly wings and the right side for body parts.
Once I got started, my worktable looked like a doll factory. I had an assortment of body parts scattered around, and kept mixing and matching them. I like to use mini brads to assemble the dolls; the brads allow the dolls to be posed, and also makes it easy to tuck the arms and legs up and down so they fold up very small for storage. Unlike three-dimensional dolls, 20, 30 or more paper dolls can easily be arranged to fit inside a shoebox for storage.
A folding tray table was used to try out different combinations of body parts
before mini brads were added to hold the dolls together and make them poseable.
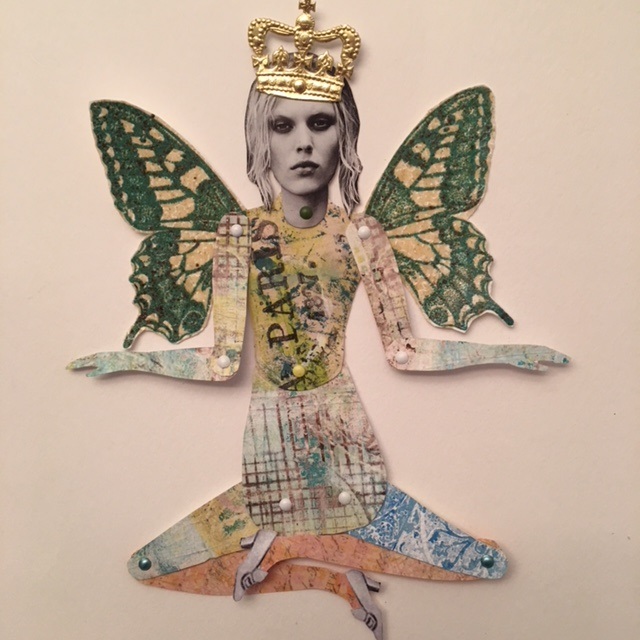
This green-toned doll has a supermodel's magazine photo face, mail art scrap body parts, embossed wings
and a Dresden Trim Bourbon Crown.
 On another, I used a Dresden Trim gold medallion and distressed it to look like an ancient warrior's helmet. To enhance the warrior/goddess effect, I added little gold wings on her feet. Later, I gave her a gossamer ice blue skirt, made from a sheer fabric gift bag with the bottom cut off.
This doll has the feel of a female warrior, with her elaborate Dresden Trim crown, embossed wings and winged boots.
Washi tape and a downloadable rose from Gwen's collection were added to enhance some of the body parts. The large and small wings have added bling with embossing powder from Emerald Creek.
Two different floral washi tapes were added in a cross design to enhance a body made from commercial scrapbook paper.
This doll has a small downloadable rose and several washi tapes on a collaged body.
Four of my favorite dolls--I couldn't quite part with any of them.
It was hard to decide which to keep and which to trade. Once I made a doll that I loved, I didn't want to part with it. Finally I created one that was perfect for my trade partner: a hipster fashionista steampunk-inspired doll. She has a magazine face, big embossed wings, distressed rust body parts made with Seth Apter's chalk paints, and most magical of all--a skirt made from an embellished Silk Sari scrap--one of the new items on Gwen Lafluer's website.
The word "seek" was made from an Artistcellar pocket stencil used with chalk paints and Baked Texture Patina Oxide, and the clock parts were gifted to me in an art trade.
On a background of chalk paint layered to imitate a rusty surface, I stenciled and embossed the word SEEK,
and also flipped the pocket stencil to get the opposite image.
This detail shot shows the embellished sari scrap skirt and clock parts.
It was hard to part with this very special doll, but I received something wonderful in exchange.
In the first trade, in exchange for my "seek" doll, I received a fabulous creation from artist Ann Sullivan Barnes. She used components from Character Construction to make this fabulous doll, which she named Liberty. Liberty also came with a beautiful red, white and blue carrying case.
"Liberty" by Ann Sullivan Barnes
"Liberty" detail shot
These type of paper dolls can also be a great shared project with children, and, depending on how they are decorated, make great additions to seasonal displays. Imagine Halloween paper dolls in scary witch costumes riding a broom or lucky leprechauns with a pot of gold!

Here are some of my favorite creative dolls I have received in trades over the years. I hope they inspire you to give paper doll making a try.
Teapot/geisha doll by Leah (last name unknown)
Mythical, magical midnight ball "Bartholomew Badger," by Joann Robinson
Turn of the century Zetti bather "Liam," by Joann Robinson
Turn of the century Zetti bather by Jeanne Draachreider
Tea party/geisha "Mi'" by Joann Robinson
Marie Antoinette theme: Madame DuBouffant, by Deb Benedict
Steampunk Doll by Kay Milam
Mizz Prissy BuZahrd by Jeanne Draachreider
Mermaids and Mermen theme; Stan the Toucan Man by Marilou Bain

Congratulations to Gwen Lafluer! Her online shop has just turned one year old. To celebrate, she is offering a really great discount--15% off Mixed Media supplies and downloads. She has a really unique and inspiring collection...I really want everything on her site! Happy shopping!


Tuesday, January 27, 2015

A Most Unusual Hendrick's Gin Man

Hendrick's Gin has a really quirky ad campaign going on. I recognized the royalty free antique image that they used as the base of the ad since I had used it in some of my previous artwork.

I spotted the black and white ad in a magazine and saved it in my collage box. On Saturday, I decided it was time to see what I could do with it.

I added some color with brush tipped Tombow markers, a strip of vintage newsprint with spray paint on it, washi tape, a mini top hat and little vintage male paper doll legs. (royalty free Graphics Fairy images)

The orange and purple strips are from some paper scraps--I tried to make some art in the style of Jeanne Williamson, who is known for her work with construction fence.

It called out for some Artistcellar mini steampunk gears from their pocket stencil series. I used Inka Gold creamy paint, which goes on very smoothly and perfectly through a stencil, even for a sloppy artist who is super impatient and always hurrying.

Last but not least, I added words with mismatched mini alphabet blocks that seemed to express the mood of the quirky man.

According to the Graphics Fairy, the "graphic is from an 1880’s wholesale Pharmacy Catalog, for some Eye Guards /Goggles, to be warn while driving, bicycling etc."

Thursday, November 1, 2012

Well, Hello Dolly…I’m in Just Steampunk, Volume 2!


If I were someone who follows numerology or plays lotto, I’d think there was some meaning to two dates—1/11/12 and 11/1/12. The first date is when I posted to my blog about the art paper dolls I made for the Roses on My Table group’s steampunk paper doll trade. The second date is when I opened my mailbox and found a complimentary copy of Just Steampunk, vol. 2, with my dolls on page 101 of the magazine.

Several months ago I sent an email to the magazine with some jpegs of the dolls that I kept for myself. (I made five, traded two and kept three.) I hadn’t heard one way or another about the dolls other than getting a polite response thanking me for my submission. So, I was jumping up and down, twirling and squealing when I opened to page 101 and found a full page with my three steampunk dolls!


One of the dolls (top photo, doll on the left) is particularly symbolic. Back in 2007 I wrote an article in Cloth Paper Scissors called “Painting Out the Panic.” One of the pieces used to illustrate the article is a figure I call “Broken Chakra Girl.” BCG symbolized my struggle with panic disorder, particularly the fifth (throat) chakra. My anxiety would cause my throat to constrict and I wouldn’t be able to speak. I also got frequent sore throats at the time.

 I used BCG’s face for one of these dolls, cut her hair, gave her a top hat, changed the color of the turquoise throat design to match her steampunk style, and made her neck a normal length. Somehow the steampunk version represents healing, with her strong, mechanical, shiny body and bold stance. Her green broken heart is no longer exposed, and is protected by her steampunk armor.

All of the dolls are made with original faces that I drew or painted. The bodies are made of painted, recycled coffee filters, painted and stamped recycled tea bags adhered to fabric, or paper. The metal textured legs and arms are cut paper from Just Steampunk, volume 1. The body with the corset and the clockworks are also cut paper from the first issue. The body parts are attached with tiny brads so they can be posed and played with.

I would like to extend a special thank you to Karen at The Graphics Fairy http://graphicsfairy.blogspot.com/ for the use of her vintage images of butterfly wings and top hats; to Zinnia at Roses on My Table for creating such a wonderful online art community; and to JoAnn at Roses on My Table for running such a great group. http://rosesonmytable.ning.com/

Monday, October 8, 2012

Semi-Steampunk Paper Doll With Beet Juice Clothing


This weekend, I tossed all my "should do" lists of projects aside and just did something to make ME feel good. Somehow making paper dolls frees my mind and relaxes me...especially when it is not for a trade, but just for me, just for fun.

I started by sizing some Graphics Fairy http://graphicsfairy.blogspot.com/ images that looked interesting onto anbegan with a basic paper doll template that I found through my trade group, Roses on My Table http://rosesonmytable.ning.com/. Next, I reduced or enlarged the pieces that interested me so they would fit the doll template. I have been collecting Graphics Fairy images, especially shoes, hats and faces. I printed a bunch of the vintage clipart out, cut them, then started playing with them to see which ones my doll would wear.

I had no plan, which was part of the fun. I started with the bottom of the body, and chose some boots with vintage advertising on them, which I attached to my paper legs with tiny brads. I used a template torso, and cut a leftover ATC to fit it and make the top, which I glued over the template piece. Another ATC made the skirt--it was from a journal page that I made a while back when I was experimenting with painting with beet juice. I scanned the beet juice painting and printed it in a small scale for an ATC.

I glued half a Graphics Fairy butterfly to each arm to create wings. The face was a vintage child's photo. I topped her off with a man's hat trimmed with a band of the beet juice ATC design. The arms, head legs, boots and hat are all attached with mini-brads so they are moveable, and can be changed if I am ever in the mood. In total, there are four Graphics Fairy images: the butterfly wings, the hat, the face and the boots. I have not named her yet...any ideas?