Artists, including me, tend to hoard beautiful and/or interesting things. Sometimes we save paper goods or fabrics, sometimes it is three dimensional objects like sticks, stones, pieces of metal, beach glass, vintage game pieces, or broken jewelry. Living and creating in a small space, my hoarded treasures are usually paper. Sometimes the paper is brand new, but often times it is a snippet of paper leftover from a project, a beautiful card, mailing envelope or paper napkin.
When I need to unwind, my favorite creative outlet is collage. I pull out the bits and pieces of papers I have stuffed into shoeboxes and storage drawers and pull out about 10 or 20 scraps that speak to me at that moment. Next, I choose one or two that might be the focal point and set them aside. I choose about 10 favorites out of the remaining papers and put the rest to the side to use another time.
Without a lot of overthinking, I start tearing them into pieces and gluing them to a journal page. Depending on how heavy the paper is, I use either a glue stick or matte medium to adhere the papers.
When I am feeling cozy and soft and romantic, I tend to like earth tones and old text--especially old fashioned script and foreign words. Used teabags have a nice aged quality and add textural interest as well. Flowers, especially roses, add to a romantic feel, as does sheet music.
For the collage above, here's a few shots of how the page came together:
 |
| Torn pieces of French handwriting, vintage sheet music, the inside of an envelope, a printout of my own blockprint on teabags, and an old medical journal formed the first layer. |
I knew I wanted to use a photo from a fashion magazine that I had been saving. The woman was wearing an old-fashioned lacy dress and I loved the style of her up-swept hairdo and the shape of the dress. I debated about whether to keep the background--the chandelier light was really interesting--but it was large and covered too much of the page so I opted to carefully cut the figure out and place it on my background. I tested the figure in several locations on the page.
 |
| The magazine photo of a woman in an old-fashioned dress was my choice for the focal point. |
 |
| Testing the focal image on the left of the page. |
 |
| Testing the focal image on the right side of the page. |
It was hard to decide quite where to place the lady in white, but I decided to place her slightly to the right of center. I could have stopped here, but I pushed myself to go a little farther. I added a little stamp of a key from a set by Lynne Perrella by Paper
Artsy that I had printed on black ink on deli paper. It seemed just right
in the background, so I carefully trimmed it with a pair of tiny, sharp scissors and used a little matte medium to adhere it. The deli paper is very thin, and when used with matte medium, makes the deli paper nearly invisible so that the image appears to have been stamped directly on the page.
The page still cried out for more, so I softened and united the page by adding Gwen Lafluer's
Ornamental Compass stencil in white. It magically pulled the elements together and made the figure blend effortlessly into the background. The white paint on the delicate stencil added softness and enhanced the romantic feel. I could have stopped here, but there was a big, open space on the left side and I decided it needed words, so I pushed ahead.
The question was: What kind of words? Should I hand-write some words? Use a stencil? Use a stamp? Find some large words in a book or magazine and glue them in? I'm not a particularly talented calligrapher, so I decided to try one of Gwen's new stencils from the
Boho collection. Among the butterflies on the Boho Butterflies stencil are a couple of words; I chose "change" and carefully stenciled it on the page using black ink and a fingertip dauber tool (after securing it in place using some washi tape). To emphasize the word and add a little more interest, I also stenciled a small circle and arrow tip from the
deco alphabet stencil. One word and the small design filled in the empty space, and added a nice graphic contrast to the soft, romantic page. The contrast between the soft, old fashioned figure makes me think about how far women have come. A Gibson Girl of the 1860s was considered a modern woman of her time, but the great change--women having the right to vote--would not come for another 60 years, and we would not have a female presidential candidate from a major political party until 2016.
 |
| Final "change" romantic collage journal page |
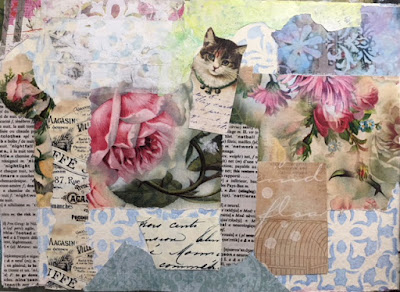
A similar technique was used on another favorite journal page. I had been home sick for several days and was feeling better and getting pretty bored. I decided to set up a mini studio on my bed atop a tray table, so I pulled out a few boxes of papers and a gluestick and got to work. First, I tore up some of the favorite leftover bits and pieces and glued them down until the journal page was covered. Some of the papers were my own designs done in Photoshop, some were papers printed with images from The Graphics Fairy, and a few were commercial scrapbook paper. It looked pretty good and I was tempted to stop there. But, I pushed myself to take it further.
 |
| Step 1 of the kitten and rose collage. |
Next, I added to the romantic feel with some corner stencils in black ink, using the
deco flower medallion repeating corner stencil.
I loved it! What a difference the stenciling makes in uniting the collage papers and drawing the eye to the center of the page. But...it also seemed to need just a little more.
 |
| Step 2 of the kitten and rose collage |
I decided it needed something to tie the corners into the center. Thinking of wrought iron, I took a black sharpie and started drawing freehand curlicues all over the page. The curvy lines reminded me of vines, and seemed to go with the rose and other flowers. Song lyrics and words flowed into my head as I was drawing, so with a fine tipped black marker, I wrote them down, and the page was finished. The eye still goes to the center of the page, but the curlicues and words also make the viewer want to look all around the page, read the words, and linger a little longer.
 |
| Final kitten and rose journal collage page |
__________________________________________________________________________
To see a great selection of vintage graphics from The Graphics Fairy, click here.
For Lynne Perrella's Paper Artsy stamps, click here.
For Gwen's website, click here.
To see what Gwen and the Artist Tribe members have been creating, click here.


2 comments:
Linda, this is beautiful. I am definitely a collector of beautiful things and seeing you incorporate this lovely lady, inspired me to go through my collection and use something! Love the stenciled word, it’s perfect for your composition. Thanks for sharing and inspiring me! xx
Linda, I am always amazed at how you pull things together, the choices you make and the way the end product looks like it was destined to end up that way. I love these pages.
Post a Comment