Thursday, October 30, 2014

Fashionista Day of the Dead

Day of the Dead is fascinating to me. The custom of leaving sweets for the dead, usually sugar skulls, combined with Mexican folk art, flowers and kind of creepy skeletal Halloween images is so unique and compelling.

This year, I made just one piece of art, which I traded with my friend Karen. I was tempted to keep it, but I let go of my inner hoarder and mailed it off, telling myself I can always make another.

I used a fashion figure from a perfume ad in a glossy magazine, added flowers from the Graphics Fairy and some bone pieces, and of course, a sugar skull. I collaged them all onto some paper I had created in Photoshop using my own printed teabags. The finishing touch was to add some brown chalk ink at the edges for an aged look.

Sunday, October 26, 2014

Return of the Pink Pup


I was stressed and tired the other night after work, so I thought painting in my journal might be just what I needed to do to relax and unwind. There’s nothing quite like randomly applying pretty paint colors to clear the mind.
I started by making scribbly marks in pinks and harmonious colors with Derwent blocks on a blank white page. I added water with a Koi brush and smushed it all around, and added more color here and there until the page was filled and it said “pretty” to me.
A few days later, I got a bunch of new stencils, so I decided to test them by applying molding paste through them onto the painted pink journal page. First, I used the harlequin stencil on the bottom two-thirds. When that was dry, I applied more molding paste through a Jill Berry compass rose stencil on the top of the page.
The look was soft and pretty, and I could have quit there, but the page seemed to want to be a background for something—a photo, some poetry, or maybe inspirational words. After auditioning a few items, I settled on a printout from a Photoshop® ATC collage I made a few seasons ago, and using matte medium, adhered it to the page.
The mischievous Coco Wyatt, with a dashing bowler hat, is at a table sipping tea. His face is pink not from the tea, but because of some artwork he “helped” with back in 2008 when he was just a young lad. If you follow my blog, you may know the story. If not, here is a link to why Coco is all pink!
 

Saturday, October 18, 2014

Tree of Life Triptych


A friend of mine has a cool tool that she uses to emboss paper. I love the effect, but wanted to see if I could achieve the effect without buying yet another fancy tool. I used a Tree of Life stencil that I had on hand and applied molding paste through the stencil onto a heavy watercolor paper.
Once dry, I painted it with shimmery acrylic in indigo and turquoise. The embossing effect worked, but I didn’t quite know what to do with the experiment, so it sat on my shelf for a few months.

When I got my pots of old gold and green viva décor inka gold, I rubbed it on the unfinished tree of life to see what happened. I liked the effect, but still didn’t know what else to do. So, I cut three of them to a uniform size and machine stitched them together into a triptych. The pieces were joined with a strip of wool felt.
I carefully applied molding paste through three of the Artistcellar pocket stencil inspirational words, and then when dry, enhanced the words with a white signo pen. The effect reminded me of old, tooled leather, and I added some “studs” made of brass-colored brads from the five and ten to give it an Old West look.
 

Saturday, October 11, 2014

Frida Kahlo Santos Style Day of the Dead Paper Dolls


With Halloween and Day of the Dead around the corner, what could be more fun than a Frida Kahlo paper doll, especially with a Santos doll base?

For this fun project, I collected a bunch of vintage Halloween images and searched online for Day of the Dead images. I used a paper doll template (If you do an online search of paper dolls, there are hundreds of resouces.) I adapted a free vintage paper doll bodice, making it thicker in the waist, and using 
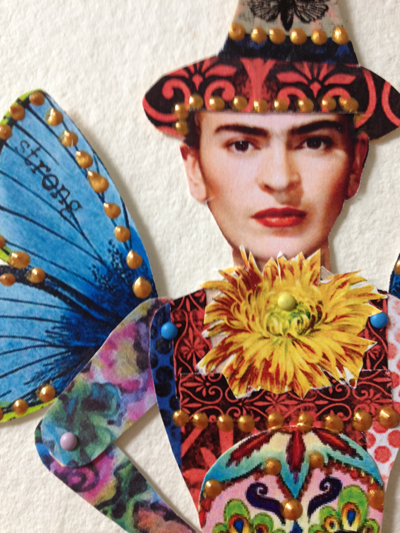
matte medium, covered it with Halloween paper. I cut the arms in half so they could be posed, and made one arm flowered to simulate tattoos.The pieces are joined with mini brads.


For the Santos skirt/bottom, I designed my own using a vintage dress form photo as my inspiration. I drew it on some printed teabags that had been stamped a little, and adhered with matte medium to heavy watercolor paper, then carefully cut it out with an exacto knife.


After some puttering with the elements I wanted to use, and rummaging through my many boxes of papers and pieces, I had the skirt/base, bodice and head ready to assemble.


Here is the almost finished Frida. She looked a little unadorned, especially on the bottom, so I added a bunch of crazy elements: a couple of sugar skulls, a vintage cat, butterflies from washi tape, a chrysanthemum, a matching witch hat and wings. I added dabs of dimensional gold paint to give it some extra pizzaz.


Santos Frida needed words, so on the base, I added some inspirational words that were printed on silk, and trimmed the to fit. Using a black ink pad, I stamped some more inspirational words on the wings.

If you want to get in touch with your inner-child, or want to have some art fun with your very own child or grandchild,  please take a look at the paper dolls on my blog. I have many, many that will surely amuse, and maybe inspire you to play with dolls again.

Saturday, October 4, 2014

Tea With Helen

I had my "debut" as a member of the Artistcellar design team yesterday.
For my first Artistcellar blog post, I started with a favorite technique—printing on recycled teabags—and used a vintage photo of my mother, Helen, circa 1934. I printed the photo from an inkjet printer onto printable silk fabric, trimmed it to size, and removed the paper backing.
For the base, I started with used teabags. After drying them, I emptied out the old tea, carefully opened them, flattened them out, and printed on them using white printmaking paint applied to an assortment of hand-carved and commercial stamps.


Once the printed teabags were dry, I randomly collaged them onto cardstock using gel (matte) medium, which adheres like glue, but dries flat, and you can stitch through it with ease.
When I laid the translucent silk photo on the teabag print base, too much of the background showed through, so I applied viva décor inka gold old gold to the central area, which made the silk photo easier to see. I added a little matte medium to hold the photo in place, and edged it with a favorite sheer lace, also adhered with matte medium.
For strength, I added a felt backing, then clamped the artwork to the felt and carefully stitched the edges with a machine blanket stitch. To give the piece even more of a vintage effect, I sponged on extra viva décor inka gold old gold to the edges and corners.

The piece especially touches my heart because, growing up, the kitchen was the central gathering place in our house, and mom always had a pot of tea to share with friends and family around our kitchen table. The dress she wore in the photo was made of a rich indigo velvet and I remember feeling ever so beautiful in it when I played dress-up.