Sunday, November 29, 2020

Lemurian Garden Swirls


Check out what I just created with my own Lemurian Garden stencils! And guess what? All the StencilGirl® stencils are on sale from November 29-December 1...including mine! Why not stock up?

I made a short and sweet video with all the photos I took...it's just under one minute long, and there's even music...enjoy! I also have detailed steps below on how the painting developed from a junky canvas that was stuffed in a closet to a swirly delight.


Here's how I made this painting:

I started with a canvas board that hadn't quite worked out.  I peeled paint skins off the front and back of my Teflon art mat and used some matte medium to glue it on. 

The  tan Teflon mat protects your work surface from spills and splashes, and is a good place to mix colors. Instead of washing them off and throwing away the dried paint, I peel it off and glue it into journals or onto canvas to add background interest. 

After peeling and gluing a bunch of peeled paint,  I ended up with a confetti look, and didn't quite know what to do next, so I shoved it in the back of my shelf and forgot about it.

Using matte medium as a glue, paint skins were adhered to a canvas board, which created a textured, confetti effect.

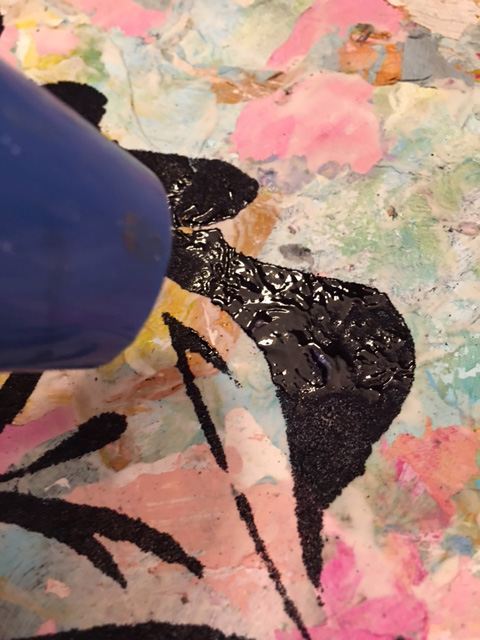
The other day I was cleaning and sorting and rediscovered the canvas. I thought "What would happen if I tried my stencils on top?"  I knew that with all the texture I would have trouble painting the surface, so I turned to embossing powder.

I had recently used my Lemurian Leaf stencil with embossing powder over some commercial scrapbook paper for the cover of a handmade journal and liked the results.  I used up old, ugly scrapbook paper and ugly painted deli paper to make the inside pages of journal. I ran a machine stitch down a pile of the paper, folded it in half, and viola, I had a small journal.

This is the cover of my handmade journal that inspired the painting.

Here's a few steps on how the painting developed:


Once all the embossing was done, I added dabs of paint with pastel Paper Artsy paint to add visual interest.


As a final touch, I added squiggly lines with Nuvo drops and dimensional fabric paint.

I hope this inspires you to give stencils a try! And there's no better time to order some than now, during StencilGirl's biggest sale of the year.


Wednesday, October 28, 2020

Lemurian Goddess


I love using and designing stencils...and I love painting portraits, so I couldn't wait to try a portrait with my very own Lemurian Garden stencils, which were released at StencilGirl® this summer. I started with a stenciled face by Andrea Matus deMeng, done in purple acylic, that I had stated a few month ago, then put to the side.

My idea was to paint an image of a goddess in an ancient garden, sort of a tropical Garden of Eden idea. Naturally I used my Lemurian Leaf stencil first. I added color and flowers and swirls and just kept going and going and going.

At one point it had the feel of a Matisse painting, but I felt the painting looked too dark. So, I lightened the skin color, and the flowers and leaves and it got very pastel. I decided to add a crown, but wanted to use either a spiral or leaf for the crown.


To my surprise, once I added the leafy spiral crown, the painting took on a feel of a turn of a late 19th century woman. The crown looked more like a hat, and she reminded me of a woman who might have been in a Renoir painting like Bal du moulin de la Galette.


Here's some detail shots of the finished goddess, and also a video (with music) of my process.


Wednesday, September 30, 2020

UpCycled Picnic Tray

 This post ran on StencilTalk, the StencilGirl blog on September 30, 2020


Hi! Linda Edkins Wyatt here, sharing how I took an old, dilapidated serving tray and transformed it into an adorable, vintage-looking picnic tray! I used paper that I designed using all five of my Lemurian Garden stencils, which was then cut, carefully arranged, glued, and sealed on the tray to give the effect of a heirloom quilt.

The serving tray that I started out with looked pretty sad: it had holes on the surface and in the corners from wear and tear, but the frame and legs were still solid. I had tucked it in a corner and thought, "It's still functional...someday I'll fix this." When the StencilGirl theme of Home Decor came up, I knew it was time to breathe new life into the old tray.

The damaged serving tray—before its transformation.

I thought about painting it and stenciling on top but decided that I'd try a pieced paper patchwork effect instead of painting directly on the tray. I have spent much of my life around quilts and fabric, but this time instead of using cloth and stitching a design, I decided to use paper for the quilted effect.

I had a beautiful sheet of paper that I made as a sample for the July 15 debut of my stencils. I scanned the painting, then made printouts from my color ink jet printer. (Click HERE to see my full post about the stencil debut.)

I started with a big sheet of white watercolor paper and added my Lemurian Stencils in pastel colors.
 

Here's the final painting that I scanned and reprinted on paper:

In this allover design, you can pick out the leaf, tulip, lily, spiral and pansy stencils.

First, before I could beautify the tray, I needed to fix the holes in it. I filled in the holds with DAP Plastic Wood. After the fill dried, I sanded it smooth.


Next, I "auditioned" various prints and solids to go with the paper I made from my Lemurian Stencil Collection. I decided on some pink vintage prints and a polka dot from The Graphics Fairy.

I alternated squares of my printed Lemurian Garden paper with vintage pink and white patterns that I downloaded from The Graphics Fairy.

I cut the papers into squares, thinking I would do a simple checkerboard effect. My inner quilter said that the checkerboard was boring, so I got brave and cut each square into triangles, then arranged those pieces in a pinwheel design, reminiscent in color and design of a favorite childhood quilt.

The paper squares were cut into triangles for a pinwheel quilt design.

Once I decided on the pattern and colors, I began gluing them onto the tray with Liquitex Matte Medium.


When I measured the squares of printed paper, they fit perfectly on the tray. Somehow when I sliced the squares into triangles and created the pinwheel design, the shapes ended up smaller, and I was left with a white strip down the middle! I debated how to fix the problem.

Washi Roll to the rescue! 

Similar to sushi rolls, I had just made some paper "washi rolls" as a Stencil Club trade. Artist and StencilClub member Wendy Baysa has a really good youtube video on how to make Washi Rolls. I had made three rolls--I traded one 3" x 28" roll and saved two for myself. As luck would have it, or maybe because I'm a creature of habit, the colors went beautifully with the pinwheel pieces and they were just the right width. The hard part was deciding which roll to use on my tray. I loved the one with the green bunny, but the one with the black and sepia Julie Balzer stamps had more punch.

The Washi Rolls above were made with several layers of StencilGirl designs with both acrylic paint and archival ink, plus collage and stamps. I used paper from a vintage piano roll, reinforced it with with deli paper, cut it into 3" x 28" strips, then stamped, stenciled and collaged them.

I bravely cut the roll and glued it in place. I loved it! But....how would I waterproof the tray? After all, what good is a serving tray if you can't clean it? I didn't intend to eat directly off the tray, but I did want to be able to rinse it off or wipe it with a sponge or antibacterial wipe without damaging the tray.

The "washi roll" was just the right width to cover the white gap in the middle of the tray.

I tested some pieces of the stenciled paper with some of Seth Apter's Vintage Beeswax embossing powder. I put on a thin layer of matte medium, sprinkled the Vintage Beeswax liberally, zapped it with the heat gun, and magic happened.

The colors darkened a little, and the test paper now had a beautiful shine. I gathered my courage, held my breath, then embossed the whole tray section by section.


Here's a close-up of the tray. You can see the Lemurian Pansy in turquoise on the bottom left, and the Lemurian Tulip in pink on the bottom right:


With the addition of the matte medium and embossing powder, the whites had taken on an ecru color, the brightness was toned down and had an aged feel. The tray took on a vintage 1930s vibe and it reminded me of  an old fashioned picnic tray. 

With that idea in mind, I decided to make a matching picnic plate. This time, since I was working with a circular shape, I chose a circular quilt pattern. I downloaded a template from the internet, and cut little petal shapes out of my leftover paper, arranged them carefully, then glued them down to a paper plate I had covered with pink polka dot paper. Again, when the pattern was finished, I covered the plate with matte medium and Vintage Beeswax and heated it until the powder melted.


Since I made the plate from paper and glue, it is a prototype, and I will not use it for dining. But it would make beautiful design for a dinnerwear set, wouldn't it?

Inspired by the picnic mood and the Lemurian Garden theme, I took the tray to my nearest outdoor spot: Tudor City Park, a beautiful out of the way area of Midtown East that overlooks the United Nations. The quiet, peaceful park on a beautiful summer day was a perfect setting for my upcycled picnic tray and plate!