Monday, July 22, 2019

Wish Flags!


I have long admired the beauty, and the concept, of Tibetan Prayer Flags, so when Tina Walker came up with the idea of using StencilGirl stencils to create Wish Flags, I jumped at the chance.

(You can see Tina's post on the StencilGirl Blog, StencilTalk, by clicking here.)

I pulled out two of my favorite designs: a face silhouette from Borderlines, a StencilClub December 2017 set designed by Seth Apter, and 
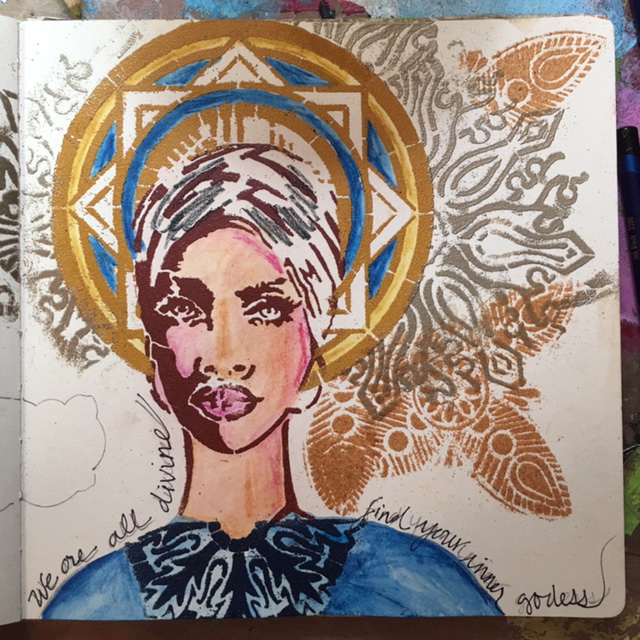
Sacred Feminine, a goddess/tree of life design by Carol Wiebe.

For the silhouette flag, I used some hand painted fabric that I had been hoarding for years. I had tried a very cool technique: drawing on fabric with colored Sharpie indelible markers, then using a paintbrush and isopropyl (rubbing) alcohol on the marker, which made it behave like watercolor on paper. (For my blogpost about creating that fabric, click here.)

I positioned the Borderlines face silhouette stencil on my fabric, then sponged white acrylic paint on using a cosmetic wedge. It looked pretty good, but the white was a bit lighter than I wanted. I decided to put the stencil back on and go over it with VersaMark ink. After removing the stencil, I sprinkled white embossing powder liberally over the fabric, shook off the excess powder, and blasted it with my heat gun. Success!
The next phase was to decide how to finish it. I auditioned all kinds of trims and ribbons, and finally settled on combining two laces on the bottom. Before I added the lace, I stitched a casing at the top for a hanging rod to go through, and finished the sides. The lace echoed the strong but feminine mood I was aiming for.
 
I reinforced the casing with a decorative floral stitch.


Some of the lace needed to be hand-stitched to ensure that it wouldn't unravel when hanging outside.
For the purple Goddess flag, I first sketched out my idea on a piece of watercolor paper and used sepia ink where I wanted the figures to go. I was happy with the look, so I moved on to fabric.

A deep purple commercial batik seemed just the right fabric, and i decided to use white acrylic, applied carefully with a cosmetic wedge sponge through the stencil.
 
 
 One change I made was that I decided not to have any words on the flag. Instead, I flipped the tree stencil creating a mirror image that sugggested roots.

 There was a lot of fabric at the bottom and I debated about whether to cut it off and add a trim or beads and auditioned a lot of items to hang from the bottom--from coins to beads to feathers. In the end, I decided to cut the fabric and create a fringe, then hand-stitched some indigo and white cloisinee beads to each fringed strip.
Each bead was hand-sewn to the bottom strips, which added both weight and visual interest.
Last but not least, I attached a few beads to a strip of the fabric that would hang from the edges of the hanging dowel.

I live in a high-rise building in New York City and don't have a yard or even a patio, so I am gifting the flags to my brother. They will be delivered when I visit him later this summer, and we can hang the together.


Sunday, July 7, 2019

We Are All Divine

Many religious and spirituals traditions teach that we are all connected to the divine, to God, to the supreme being. Yet we treat ourselves sometimes worse than we would treat another human. We doubt ourselves, we have an inner critic who tells us we are no good, that we can't do what we dream of, that we are not worthy of success and happiness. Unearthing our own inner beauty was on my mind as I worked on this portrait.

The words "we are all divine, find your inner goddess" came to me about halfway through the piece, so I wrote them around the shoulders and neck of the figure with a fine sharpie.

I started with a StencilGirl® face design by Karen Johnson called The One. I chose the stencil because I wanted to create a universal, multi-cultural/multi-ethnic image.

I was excited try try my new Boho Blends embossing powder, developed by Gwen Lafleur for Emerald Creek. I applied sticky VersaMark ink through several stencils, sprinkled embossing powder, shook off the excess and blasted it with a heat gun. I also used quite a few of Gwen's stencil designs.

I knew she needed a halo, and I tried several different methods of creating it.  After some trial and error, I combined one of Gwen's stencils with a circular design by Nathalie Kalbach, and added some gorgeous blue Boho Bits for texture.

I made a short video that shows all the steps.

You can also check out some of the steps in the photos below.

 I decided the face and the background needed some color, so I used Derwent watercolor pencils to liven up the page. I also added the words "we are all divine, find your inner goddess" to the page.
 The pink and lavender accents looked pretty, but the halo was getting washed out, so I re-did the halo.
 The halo needed more depth, so I added Nat Kalbach's Grove Street stencil with the Lapis Lazuli Boho Blend.
 I wanted some interest on the right side of the page, so using black archival ink, I added a triangular border stencil from Pilgrimage to India by Laurie Milka.
 Last but surely not least, I used heavy gel medium and carefully applied the Boho Bits around the inner edge of the halo. I dabbed coordinating dots of Nuvo Drops on the outer halo and edge of the hairline.
With the addition of a little extra color on the hair, cheeks and lips, my divine goddess was almost finished. She needed wings. I had tried several wing ideas, and finally settled on a Baby Angel Wing by Kristie Taylor. Done in fine white embossing powder, it was the final accent that the page needed.
This artwork reminds me to embrace my own spirituality, that we are spiritual beings having a human experience, and helps me remember to treat myself and others with kindness.


Tuesday, July 2, 2019

Inner Goddess


When StencilGirl® gave the concept of "texture" for my July 2019 post, I decided to do what I like best--a portrait. I used some of my favorite products: white crackle paste, embossing powder, and acrylic paint along with some gorgeous stencils to give both a 3-dimensional texture and painted texture to the piece. 

Here's a short video (less than a minute!) that shows how the portrait developed:

To read all the details about my goddess, and see the step-by-step photos, here's the link to my post on StencilTalk®