
Lately, my personal challenge has been to use up what I have
on hand before buying new art materials. I have boxes and boxes of paper
scraps, unfinished projects and things that just didn’t turn out quite right.
On Sunday mornings my husband watches all the news shows for hours, so I have a
window of undisturbed art time to putter and sip my coffee.


This Sunday, I pulled out my boxes of little bits and pieces
to see what I could do. As I was sorting, I came upon a little brown cardstock
figure that I purchased from Retro Café Art. It was smaller than I
was comfortable with, and I had put it together with little star brads just to
see what it looked like, and then put it aside.


I decided that one of the problems was that the star brads
were too big, especially since they had points sticking, out so I took the doll
apart. Next, I sifted through my piles of scraps to find something just right to
cover the body parts. For the face, I thought I might use a mini-self-portrait
from an old business card. The template had a teeny tiny head, so I cut mine a
little bigger. I found some old ATCs that weren’t quite right, and used the
sections I liked for the arms, legs and body.


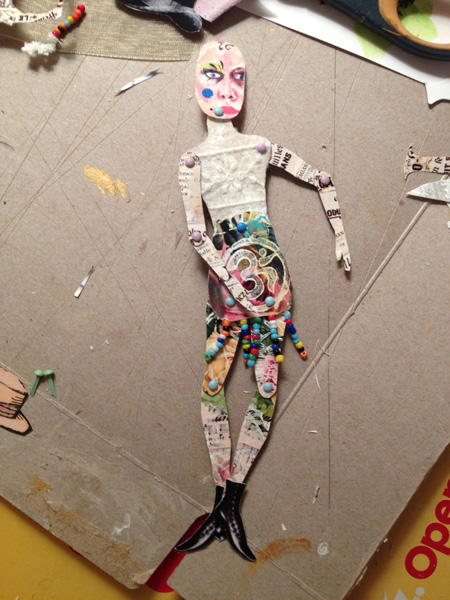
With matte medium, I glued some vintage advertising typography
from the Graphics Fairy to the arms. The legs are floral sections of cast-off ATCs,
and the upper body has printed tea bags with a snippet of sheer lace. The
bottom torso has a stamp of the OM symbol—also from a section of an imperfect
ATC—and some beaded trim at the bottom edge for the suggestion of a skirt.
This time, I put the parts together with tiny mini brads in
pastel colors, which worked better than the stars. Any points that were
sticking out from the backside were snipped shorter with a jewelry wire cutter.

One of the fun parts of art paper doll making is putting it
together—you never quite know what the doll will look like, and what kind of
“personality” it will have until all the parts are connected. I often switch
out faces or clothing until it seems right. I didn’t like the face as much as I
thought I would, so I rummaged through my baggie of faces and found one I had
made a few months before. I made a bunch of heads when I tested some Dina
Wakely face stamps, using Artistcellar's black ink pad and Derwent blocks for spots of color.
(Non-water soluble ink works best if you are planning to add color after the
stamped image dries.)


The new head was oversized for the body, but it added to the
eccentricity of the doll. It also wasn’t a happy, beautiful face—it is actually
kind of sullen—but then, who is always happy and beautiful?
For pizzazz, I added a pair of vintage boots, also from the
Graphics Fairy. Somehow my dolls don’t seem complete without wings and a hat,
so I added a bowler hat and my favorite Graphics Fairy butterfly (cut in half
and glued to the upper arm with matte medium, carefully avoiding gluing the
brads, so that the doll will still be poseable.) The finishing touch was a
saying from a Yogi tea bag: You are unlimited.


The doll reminded me of an angst-filled teenager who doesn’t
fit in anywhere. It seemed that she needed the extra oomph of the inspirational
words from the tea tag, the OM symbol and the butterfly wings, to empower her
and know she is okay just the way she is.
1 comment:
Fantastic, fun, artful doll! Just love it!
Post a Comment